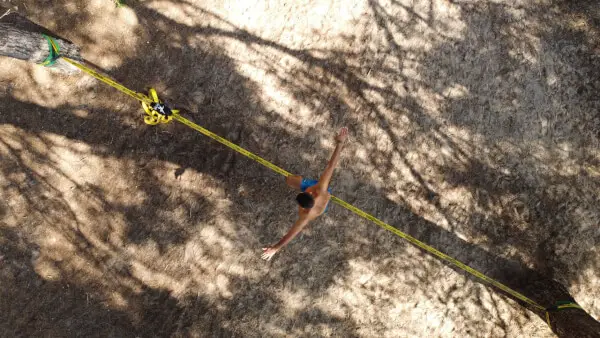
To see someone walking on a thin line, whether they are suspended hundreds of feet up in the air between two cliffs or between two trees just a foot off the ground, is unanimously cool.
The novelty of being able to freak out your friends and family is definitely appealing, but so is the physical challenge, mental clarity and sense of adventure involved.
See also: Best Slackline: Balance Training for the Bold
In this article we’ll talk about the history of slacklining, the different types, and how to make a slackline using either a primitive rig or a ratchet system.
Three Reasons to Slackline
We’ll give you three good reasons why slacklining is definitely worth trying. Fun, physical, and one you probably didn’t expect: meditative.
Fun
There’s the adrenaline rush you get from trying something new, something with a little bit of danger and the reactions passersby will give you. With slacklining, there’s always something new to learn too. You can stand for five minutes? Great! Now figure out how to walk three feet. Got it? How about trying to flip?
Plus, it’s a sport best done outside, which will always raise your endorphins. Not only is it best done outside, but it’s very lightweight and portable making it fun you can travel with. You can prove to everyone that you don’t need a lot of money to have fun too.
Physical
Walking a line is not easy. It engages your whole body as well as your mind. The physical aspect of slacklining will increase your control over your body, muscle strength and posture. Slacklining hits your quads, lats, arms and feet.
With slacklining, you raise your arms above your head, not out horizontally and it’s best done barefoot. So even your extremities will feel the burn on this workout.
Your muscles will work hard to keep you balanced as you learn how to properly distribute your body weight. Your lower body doesn’t need to move much, except for your hips. Your core and back muscles are heavily engaged through slacklining. In the long run, this means you’ll have better posture and delayed back pain.
Meditative
Often called “moving meditation”, slacklining requires intense focus on the task at hand. You constantly need to be making adjustments with your body, especially at first, and you can really only look ahead of you.
This sense of focus is similar to what is experienced and practiced by yogis. You’ll develop a calm mind that can shut out wandering thoughts. You’ll be able to allow yourself to be driven singly towards your goals within and beyond slacklining.
A Brief History of Slacklining
You might be asking: How’d this crazy sport develop? In some sense, it’s always been around. People have always been tying ropes between trees and trying to balance on them. Think of circus tricks and tightropes, gymnastics and balance bars.
The different between rope walking and slacklining is the quality of the rope. Slackline is dynamic, meaning it moves with you. A rope or a cable, will not stretch and move with you which means the muscles and training required to walk a slackline are different that the ones you use for static ropes.
The story of slacklining begins in the early 1980s with two men. Once upon a time, Adam Grosowsky and Jeff Ellington, climbers in Yosemite Valley, CA were taking a break from a strenuous climb.
They took a flat length of nylon webbing and tied it between two rocky outcroppings. After lots of laughs and clumsily falling over, they learned how to move with the line. The rest as they say, is history!
Prepping Your Body for Slacklining
One of the coolest things about slacklining is the fast learning curve.
You’ll improve rapidly over a few sessions, especially at first when you’re starting from zero. Here are some tips and tricks for getting you ready to walk the line:
- For a minute before you get on the line; jump around, shake your arms, legs and whole body.
- Start with the slackline at waist level or 1-2ft off the ground. Keeping it low allows you to get on and off the line more easily, builds your confidence and sense of safety. At this height, if you fall, you won’t be too terribly hurt.
- Find a friend! Ask someone to spot you. You can use their hands, arms and shoulders to stabilize you and relax you into the movements necessary to slackline. Keep your arms stretched out as far as you can so you start to get the hang of it yourself.
- Put one foot on the line and put most of your weight on that leg. The leg that is anchored to the ground is taking about 30% of your body weight.
Relax, look forward, and take a deep breath. Get up on the line. Practice doing this with each leg until you get the hang of it. - Practice staying in the same spot. You’re learning how to find and maintain your balance. As you become more comfortable, alternate standing on one leg at a time for a few seconds.
- Use your arms. They should be raised to head level, but play around with it. Using your arms will help you find your balance and the understanding between how your arms and legs work together to keep you upright on the line.
- Pick a focus point. The other end of the line, a tree, a flag, a set of stairs. Whatever you’d like to focus on that’s not going anywhere anytime soon. Don’t look at your feet or you’ll throw your balance off. Focusing your mind will help focus your body.
- Short and slow. Take short, slow steps at first. Out of fear or excitement, you may want to get to the end as quickly as possible but part of the joy of slacklining is enjoying the process and trusting your body. If you rush it, you won’t develop the confidence or skills to have very much fun or effectively slackline.
- Breathe deeply. Breathing deeply will help you to control your body and emotions which will help you walk without falling.
- Take breaks. Learning to slackline can be frustrating and tiring both mentally and physically. This is about fitness and fun, don’t allow your drive to take away from those points.
Eight Types of Slacklining
There are eight types of slacklining you’re going to want to be aware of. Since there is so much variety in the sport, you can definitely find the right type of slacklining for you.
Longlines
As the name suggests, this is slacklining with a line longer than 100 feet. The longer the line, the less steady it is and therefore more difficult to walk. The longest slackline walked was 2,000ft by Alexander Schulz in Mongolia 2015. Laetitia Gonnon holds the record for the longest slackline walked by a woman, it was 750ft. She completed the feat in 2014 in Lausanne.
Highlines
Highlines involve walking at elevation about ground or water. It’s considered the most mentally taxing because though you should be attached to a harness and leashed to the line, subconsciously (or consciously depending on who you are!) your mind will take in the sky to ground ratio and recognize the potential for danger.
To stay safe on a highline walk, rigging is vitally important. There is the mainline of webbing, backup webbing, and another rope (like amsteel or climbing) as extra precautions. Just as important as proper rigging, are harnesses.
The harness is leashed to the slackline so if you fall, you stay attached to the line. Though “free solo” slacklining, which means walking without a leashed harness, is not uncommon, it is not your safest option.
Tricklining
With most sports, there’s a way to jazz it up and show off. Think of all the skateboarding or ice skating moved there are. Slacklining is no exception. Tricks on a slackline usually come in the form of jumps, flips, and walking backwards. These slacklines are usually done closer to the ground and with 2in wide slacklines.
Since the technology around slacklining is changing frequently to catch up with demands in popularity and versatility, the limits for tricks are constantly being altered.
Urbanlining
Practiced in urban areas like city parks and on streets, urban slackliners also use 2in wide lines for tricklining but 5/8 or 1in lines for longlining or water lining.
There are two more types of slacklining that are popular among urbanliners:
- Timelining. When a slackliner tries to stay on the line for as long as possible without falling.
- Streetlining. Combines street workout power moves with slacklining. Examples include: handstands, front levers and back levers.
Waterlining
This type of slacklining occurs over water areas such as pools, rivers, lakes, creeks, pier pillars and boating docks. The slackline can be set up underwater, close to the water, or high above the water.
Whatever suits your preference and goals! What’s most important is that the water is deep and clear of rocks, trash, other people (like swimmers and kayakers), animals, and boats.
Windlining
If you slackline in very windy conditions, it’s considered windlining. The wind adds another element for the walker to adjust their body and mind to create balance and overcome fear. Windliners say it feels like flying.
Yoga Slacklining
Looking to add slacklining to your yoga practice? As we’d said, many of the same concentrative and meditative qualities of yoga can be applied to slacklining, but you can actually do yoga while slacklining.
A skilled slackline yogi can create a flow of yoga poses that can develop focus, balance, controlled breathing, flexibility, core strength, and empowerment.
Freestyle
Freestyle slacklining typically happens 2-3ft off the ground and over 15-30ft of slackline. Because the line is so “slack”, meaning low tension, it allows for different tricks and maneuvers. Freestyle involves swinging and static moves, creating a whole new dynamic for users.
Gear for Slacklining
You’ll need some equipment for slacklining.
You don’t need much but here are some suggestions for when you’re just starting out.
- 50ft or more of webbing for the main line
- 2 pieces of 10-15ft length webbing, 1” wide, for making the anchors,
- 5 carabineers. Make sure they are rated for climbing strength.
- 2 pieces of cardboard/carpet/towel/ or something else creatively made or store bought to protect the tree from your anchor straps and to protect your anchor straps from wearing down quickly. Approximately 1x3ft each.
Optional Gear
- A line locker is optional depending on the type of slackline you build.
- A swami belt/climbing harness and leash line are optional, especially if you are just learning and not slacklining over a significant elevation or distance.
- 1 or 2 ratcheted slacklines, they usually come in a kit with everything else you’ll need like carabineers.
Ways to Make Your Slackline
There are basically two ways to make a slackline and they each have a few variations.
The two main types are Primitive Rigs and Ratchet Systems. Below is a pro/con list to help you decided what’s worth investing in for your skill level and needs.
Primitive Rigs
Pros:
- Lightweight
- Take up less space.
- Cost less than ratchet systems.
- No mechanical failure or maintaining.
- Webbing can’t get damaged from a ratchet.
Cons:
- Takes a long time to set up, especially for beginners.
- Not great for tricks because of limitations with tension adjustment.
Ratchet System
Pros:
- Cheap
- Fast set up.
- Can be set up by one person easily.
Cons:
- Heavy and bulky.
- Webbing can be damaged by ratchet.
- Mechanical failure is a possibility and maintenance is required.
For longer distances, you will need to employ more advanced pulley systems, longer webbing, and different kinds of webbing. This article is written for those beginning to slackline so we will not get into those.
Primitive Rigs (With a Line Locker or Tying a Hitch)
Now that you know a little bit more about slacklining’s history, the different ways to slackline and the gear you’ll need to slacklining, it’s time to set one up and get going!
First we’ll talk about how to make your line with either a line locker or tying a hitch.
- Select Anchor Points. When we say ‘anchors’ we mean something you can tie your line to. It should be able to hold 500-1000lbs and will most likely be a good sized tree.
You can also use telephone poles, volleyball poles, posts, railings, street signs or you can build your own. Find a grassy area that’s flat and free of rocks or other objects.
Look for anchors that are about 15-20 feet apart. As a beginner, these shorter distances will be easier to learn on. Wrap your cardboard or carpet around the anchors you’ve chosen. - Build the Anchors. If you’re using trees as your anchors, protect the trees from being stripped of their bark from your line. You can do this by wrapping the part of the tree that will come into contact with the rope with padding.
Cardboard or carpet are good options. Wrap the loop of webbing around the first anchor. You want it to be 2-3 feet off the ground. Attach one carabineer to the loop.
Repeat for the second anchor but use two carabineers. Make sure the carabineer goes through both loops of each anchor and that the gate (part that opens) of the carabineer is facing out. - Set Up the Slackline. Tie one end of the slackline webbing to the one carabineer anchor. You can use a clove hitch or a line locker. Take the line with you as you go over to the second anchor. Make sure the line does not get twisted.
When you’re about 80% of the way to your second anchor, tie another clove hitch or set the line locker, and secure your two carabineers into the loop. - If you’ve set the line locker. From the line locker, pass the webbing from top to bottom though carabineer 1. Carabineer 1 is the one attached to the anchor. Next, pass the webbing from top to bottom through the carabineer with the line locker.
Then pass the webbing from top to bottom through carabineer 2, the one next to carabineer 1, also attached to the anchor.
NOT the one with the line locker. This zig zag pattern connects the carabineers and creates a pulley. Pass the webbing bottom to top under the loop of webbing on the line locker carabineer. You’ve now created a friction lock, pull it tightly.
Or If you’ve tied the clove hitch. Feed the excess webbing through the bottom carabineer on your anchor. You’ll want to feed the webbing from bottom to top. Then feed it through the carabineer attached to the line from bottom to top. Finally, feed the webbing through the top carabineer on the anchor from bottom to top and from the top carabineer on the line from bottom to top. - Tighten the Line. No matter how you’ve tied the webbing, pull it tight. Test the line by sitting and bouncing on it. You will know if it is tight enough when you can walk to the middle of the line without it touching the ground but feel free to experiment with different levels of tautness for the webbing.
- Loosening the Line. Pull the webbing in the opposite direction that you tightened the line.
Ratchet System
Perhaps the simplest way to make a slackline is to use ratcheted webbing.
You can either use one ratchet or two. Below we’ve outlined directions for using two ratchets.
- Select Anchor Points. Just as you would with the above two methods.
- Build the Anchors and Set Up the Slackline. The ratcheted straps come with loops. Simply pass the webbing around the tree and through the sewn loop. Make sure the webbing stays flat and doesn’t twist.
You want your ratchet handle facing down. Use one hand to keep the webbing straight and centered on the axle as you crank it through. Check that the loop on the tree has also remained strong and straight.
Walk the rest of the line to the other anchor and wrap it similarly. Thread the webbing through the ratchet slot from the bottom and pull through over the axle. Continue to pull until the webbing is taut.
Bring the handle of the ratchet to a parallel position. Push each ratchet closed until it clicks and is locked tight. Make sure the handle is always locked behind the safety latch when in use. - Loosening Your Ratchet. To release the lock, pull at the middle handle and pull it all the way back until it locks into an open position. Pulling the middle handle even further, to a vertical position, release the tension and releases the strap entirely.
For more guidelines on how to tie knots, see our earlier piece to help you.
Final Thoughts on Making A Slackline
Learning to walk a slackline can be a great source of fun, fitness and empowerment. It’s a great way to get outside and enhance not only your mind but your body as well.
We’ve gone over the history, physical prep work, equipment, and a few different ways to make your slackline dreams a safe reality.
Whether you got for a primitive rig or a ratchet system, we wish you many happy adventures!
Featured Image Source: https://www.pexels.com/photo/people-summer-rope-sport-5263002/