Paracord is a very useful tool for people in all kinds of professional and recreational settings. While you can buy them, knowing how to make a paracord bracelet is a great skill because it allows you to customize your bracelet to your needs. Paracord has a history of being used as a life-saving tool in many situations.
Prior to World War II, parachutes were made of silk naturally produced by the silkworm. When Nylon, a synthetic silk, was invented by DuPont, large-scale changes were made to airborne warfare.
The military was able to mass-produce Nylon parachutes and the paracord used by the paratroopers in World War II. The paracord is lightweight and versatile, so soldiers soon found many innovative ways to use it even after their boots hit the ground. Paracord is still used by the US military as well as NASA. It was famously used to make a repair to the Hubble space telescope during the NASA mission STS-82.
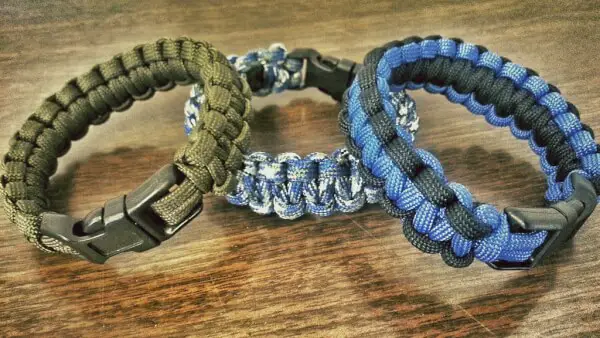
Due to its durability and versatility, paracord is now a useful tool to people in all kinds of professions. Rather than keeping it in a balled-up knot in your backpack, an easy way to keep paracord on hand for all situations is by wearing it woven into a paracord bracelet.
Many retailers sell these bracelets, most notably the company Survival Straps from Florida. However, you can customize your own by learning how to make one.
Why Make Your Own?
While many excellent paracord bracelets are available for sale, designing your own allows you to cater to your needs. Also, even if you do purchase a bracelet it is very useful to know how to re-weave it because you might need to unravel your bracelet at some point to use the paracord.
Knowing how to make your own allows you to repair used bracelets. Many variations of materials are available, so choose wisely while keeping in mind the purpose your bracelet is most likely to serve.
There is more than one type of paracord, although the most commonly used is 550 paracord. This is classified as a Type III paracord and can hold 550 pounds. It is typically made of 7 to 9 core yarns woven together. In contrast, Type I paracord contains 4 to 7 core yarns and has a strength of 95 pounds.
Type III or 550 paracord is used most often to make bracelets. Paracord can come in military or commercial varieties.
The main difference between the two is that military paracord is usually made of nylon while commercial paracord can be made of polyester. While polyester is more heat-resistant, nylon is stronger and more weather resistant. You can purchase paracord from outdoors retailers, craft stores, or military surplus outlets.
Another consideration for making your own paracord bracelet is the ability to choose your own color scheme. Paracord comes in many colors but depending on your intended use one color choice might be better than another.
For example, turkey hunters (who are targeting animals with excellent color vision) would choose a muted color over the neon orange often used in bracelets. In most cases, though, color is up to the personal preference of the wearer.
Bracelet Basics
In this article, we will go over how to make paracord bracelets with and without a buckle. The style with a buckle only requires one color of paracord, although the design can be modified to use more than one color. The style without a buckle uses two colors.
There are many resources that describe how to use different weaving patterns to create various bracelet styles, but it’s important to know the basics in case you need to make repairs to your bracelet. After all, it’s meant to be unraveled!
Supplies (For both styles of bracelets described here):
- Scissors
- Tape measure
- 550 paracord (about 10 feet)
- Lighter and candle
- Side release buckle
- Piece of wood with nail or peg (For bracelet without buckle)
How to Make a Paracord Bracelet with a Buckle
Step 1: After the bracelet is cut to the correct length, cauterize the ends of the paracord with a lighter so that they don’t fray and unravel your bracelet.
Step 2: Attach the male end of the buckle to the paracord. Fold the paracord in half, then pull it through the bottom slot on the buckle. This will leave a loop where the cord is folded. Insert the ends of the paracord into the loop and pull through all the way to affix the paracord to the buckle.
Step 3: Attach the female end of the buckle. This is where your desired length comes in. It is a good idea to set a tape measure on a flat surface next to your paracord for measuring ease. Insert the free ends of the paracord through the slot on the female end of the buckle and slide the buckle all the way up to the desired length of the bracelet.
One important consideration here is that the size of the buckle is included in the desired bracelet length. So when positioning the female buckle, keep in mind that the total bracelet length will go from the middle of the male buckle to the end of the female buckle.
There are many different designs for paracord bracelets. These have different uses and different styles. The bracelet we are making here uses only one color. It will be woven from the end of the female buckle.
Step 4: Lay the bracelet flat. Extend the two loose ends to the side. To be clear, we will call these pieces the left strand, the center strands, and the right strand.
- Thread the left strand under the center pieces and over the right strand.
- Pull the right strand over the center pieces and up through the loop created by the left strand and the center pieces.
- Pull tight! Your bracelet is started!
Step 5: Continue weaving the bracelet.
- Repeat the steps you used for your first knot, but start from the right this time.
- Thread the right strand under the center pieces and over the left strand.
- Pull the left strand over the center pieces and up through the loop created by the right strand and the center pieces.
- Pull the two loose ends to tighten the knot.
- Continue tying knots down the length of the bracelet until you reach the male buckle.
Step 6: Finish your bracelet. You will notice that the male end of the buckle has a second slot. Take the loose ends of the paracord you’ve just woven and pull them through that slot. Loosen the last knot you made and pull up a little bit so that it forms a small gap. Pull the loose ends of the paracord back through that loop and tighten. Finally, cut off the excess paracord and use your lighter to cauterize the ends of the finished product. If you’d like, you can tuck them into the braid so that they don’t poke your wrist.
How to Make a Paracord Bracelet without a Buckle
You can also make a paracord bracelet without a buckle. This will be a little different, but once again, the possibilities are endless once you experiment with different colors and styles of weaving. It’s just a matter of personal preference when choosing which type to make.
For this bracelet, you will need two different colors of paracord to make it easier to differentiate between strands during the weaving process. For this tutorial, we will call the two strands “blue” and “black” but you can use any colors of your choice.
Step 1: Measure your wrist. Use about a foot of paracord for every inch of your wrist’s circumference. Add another foot to this total for good measure. For example, if your wrist’s circumference is seven inches, you will want 8 feet total of paracord. Divide this into two; each color of paracord you use will make up half of the total length. So, for this example you would want 4 feet of blue paracord and 4 feet of black paracord.
Step 2: Fuse the ends of the two strands of paracord together. The easiest way to do this is by lighting a small votive candle and holding the ends of the paracord together while they melt into each other. Press them together while turning to ensure that all of the yarns are fused. The resulting point of attachment will be very strong.
Step 3: Wrap a third, smaller (about 12 inches) piece of paracord around your wrist and double this length. Cut and tie into a loop. The circumference of this loop should be twice the circumference of your wrist. It is a good idea to leave extra length on this as well, as it will provide the “backbone” for your bracelet.
Step 4: A useful tool for making this bracelet is to have a piece of wood with a peg or a nail tapped into it. This helps to hold the strands taut and keep everything in one place. Place the “backbone loop” of paracord around the peg and pull tight.
Step 5: Place the fused paracord underneath the loop with the fused part in the middle of the backbone loop.
Step 6: The knot we will be using for this bracelet is called a cobra knot. Once again, there are many different knots you can use. To begin the cobra knot, take the blue strand and place it over the backbone loop. Then, take the black strand and place it over the top of the blue strand but run it underneath the backbone loop.
There should be some space between the blue strand and the backbone loop, so run the black strand up through this space. Pull tight for your first knot.
Step 7: Repeat Step 6 as you weave cobra knots down the length of the backbone loop. The black strand should alternate between the left and right sides while forming the edge of the bracelet.
Step 8: When you reach the bottom of the backbone loop, use your lighter or candle to cauterize the ends of the blue and black strands. If you want, you can tuck these ends into the knots of the bracelet to hold it all together. The knot at the end of the backbone loop will can be pulled through the loop at the top (which had been wrapped around the peg) to hold it around your wrist.
How Can I Use My Bracelet?
Congrats! Now you have one (or two!?) awesome bracelets. Now, how are you going to use it? Paracord is fantastic to have on hand (literally) for all kinds of purposes. For a backpacker or hiker, it can be a good tool for gear repair or supplementation. For more uses of the paracord bracelet, see our article on this topic.
When a boot lace breaks on the trail, paracord can be used to replace the laces. It is also useful for lashing gear together, like a wet tent you aren’t ready to stick back into your pack yet.
Paracord can be used to tie it to the outside of your pack so you can continue your hike and help it dry simultaneously without soaking other gear inside your backpack. You can also use it to lash pack covers or makeshift plastic coverings onto gear to keep it dry while hiking in a rain shower.
Don’t forget: paracord is made of many smaller strands woven together. You can unravel it to obtain smaller pieces of nylon that you can use as thread for repairing holes in tents, clothing and backpacks. Whole pieces of 550 paracord are good for pack repairs such as replacing broken straps and buckles.
Use paracord to help secure your tent in windy conditions by tethering it to trees or large rocks. It is also useful as a way to hang food above the ground and out of reach of bears. An easy way to do this is to fill a water bottle up (for weight) and tie the paracord around it.
Tether the other end of the paracord to your food and toiletries bag and throw the water bottle over an overhanging branch. This creates a hoist for you to lift the food up and off the ground.
Paracord has several medical uses which are not limited to tourniquets and a thread to use for stitching wounds. Always keep in mind that there is an infection risk when using paracord (or any non-sterile material for that matter) for medical purposes and only use it with open wounds when necessary to avoid contamination of the wound.
Slings and splints can also be made with the aid of paracord.
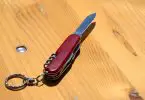
A bracelet is the best way to ensure that you have it on hand when you need it, but the techniques for making paracord bracelets can also be applied to making paracord keychains and other crafts as an alternative or in addition to wearing it as a bracelet. There are many uses for paracord published online, but all it takes is a little innovation for you to find a way to use it in the way that best suits you!
For more information on other types of outdoor ropes, see our article on this topic.
Featured Image Source: https://www.flickr.com/photos/29053927@N05/9721202956