So you love the outdoors and you love to hike, but when winter comes around you find yourself stuck inside, wishing you could get out and trek. Anyone who has had to walk through even moderately deep snow knows that it can be tiring and impractical for getting from here to there except in the shortest of distances.
If you have to break a sweat just getting to your car through the snow, how are you supposed to get outside and get around in a manner that lets you enjoy your surroundings?
Enter the age-old invention, the snowshoe, a special piece of footgear that allows you to walk on top of the snow rather than struggle through the snow.
See also: How to Snowshoe: A Beginner’s Guide
But before you run out and buy the coolest high tech snowshoes, there are a few things you should know.
This article will give you a rundown on the basics of learning how to snowshoe, including a bit of relevant history, how to select the right gear, planning your trip, and finally getting out and learning how to trek over the snow covered mountains and countryside while comfortably walking on the snow rather than through it.
The Snowshoe: A Brief History of How We Learned to Walk on Snow
It is prudent to mention the history of the snowshoe, because it has bearing on the different types, sizes, and shapes of snowshoes we use today.
The exact date of the invention of snowshoes is unknown, but we do know that as long as 4000 years ago the peoples of Central Asia were using a crude, roughly bear-foot shaped design made of a flat piece of wood with animal skin bindings.
This design allowed maneuverability as well as the ability to walk quickly on deep snow, perhaps giving them the ability to cross the northern land bridge that led them from Asia to northern North America.
While it’s also unknown just how the idea of the snowshoe came about, it’s not a stretch to theorize that we got it from observing certain animals’ ability to walk on top of the snow by spreading their body weight over a greater area, as is the case with the Snowshoe Hare and its long, wide feet.
Because humans walk on two legs, with relatively small feet, our weight is focused rather than distributed, and we sink right into the snow.
The snowshoe allows us to distribute our weight over a wider surface area, resulting in a lower pressure acting on the surface of the snow.
The native Indians of the northwest and Great Lakes regions perfected the snowshoe by using a bent wooden frame with an upturned toe, a feature found on today’s designs that are laced with animal hide or sinew rather than using a flat, wood surface.
American Indians developed different designs to adapt to different types of snow, whether it be heavy and wet snow, light and fluffy snow, deep snow, shallow snow, or hard and crusty snow. When selecting a snowshoe for your adventure you will be faced with similar options. American settlers quickly adopted the idea, and used the snowshoe both practically for travel and recreationally for leisure.
The snowshoe became a necessary piece of gear for trappers, settlers, and even the military. The recreational use of snowshoes is evident by the first snowshoeing clubs, which came to be in 19th century Canada.
Today, snowshoeing is a popular winter activity, having perfected the design with the use of plastic or aluminum frames, flexible bindings, and tightly woven mesh treads or even solid plastic treads. Some designs even utilize cleats for better traction on hard or icy snow in hilly or steep, mountainous terrain.
Modern Snowshoes: Which Design Should You Choose?
Modern snowshoe designs have been perfected around the intended use of the snowshoe. There are designs that are intended for carrying heavy loads over deep, backcountry snow, designs for recreational trekking along well-used or groomed trails, and there are even designs for racing.
As a beginner to the sport of snowshoeing, you will want to choose a design that is versatile, maneuverable, and comfortable.
Weight and Length
Snowshoes designed for the beginner, also known as recreational snowshoes, have a frame that is moderate in width; wider than racing designs and narrower than back-country designs, with a shorter and more rounded tail.

These shoes are best used on relatively packed trails over even or mildly hilly terrain.
If you plan on carrying a heavy load, consider using a wider and longer shoe. For greater versatility, you can use a design that allows you to attach a tail extension and add greater flotation on soft snow, which increases the weight of the load you can carry.
The below table shows the recommended load ranges for various recreational shoe lengths.
| Weight (pounds) | Load Range | Optimal Load Range | |||||||||||
| Length (inches) | 80 | 100 | 120 | 140 | 160 | 180 | 200 | 220 | 240 | 260 | 280 | 300 | |
| 20 | |||||||||||||
| 25 | |||||||||||||
| 30 | |||||||||||||
| 35 |
Bindings
The bindings should offer both flexibility and comfort. Binding designs range from those that are similar to ratcheting strap snowboard bindings, to those that are clipped in at the toe like a cross country ski binding.
Unless you are buying boots as well, you will want to use a versatile strap-in binding that will accommodate your favorite insulated and waterproof boots.
Bindings may be fixed rotation or full rotation. Fixed rotation bindings are best for flatter, recreational terrain more suitable for the beginner; while full rotation bindings work well in steep, deep backcountry applications where maximum heel height is desired to limit strain on the calves. As for comfort, there should be no perceptible pressure points where the bindings or binding straps contact your boots.
Traction
Traction is also a consideration. Snowshoe traction limits the tendency to slip on steep or packed snow, or even icy snow. Traction is accomplished by the integration of cleats or crampons into the frame or beneath the sole of the binding.
Some designs offer cleats along the long edges of the frame, some offer lateral cleats across the frame, and some allow crampons for the toe of the boot. Mild cleats are more suitable for recreational or beginner snowshoeing, while more aggressive cleats and crampons are best for backcountry snowshoeing over steep or icy conditions.
Try Before You Buy
Many winter sports establishments allow patrons to “demo,” or demonstrate, equipment before buying it. If you are insecure about your ability to select the right snowshoe, or you find that there are just simply too many options and price ranges to choose from, the demo option is just for you.
It allows you to try out the equipment before committing yourself to a purchase. Some shops will charge a rental fee and a refundable deposit for demo equipment, while others simply take a refundable deposit.
If you have the opportunity to demo a set of snowshoes before buying, take advantage of it. No one likes to spend hundreds of dollars on gear that ends up not working for them, only to have to find a way to unload it at a loss later.
Starting Out
Snowshoeing may seem like a no-brainer when it comes to technique, after all it’s nothing but walking on snow with big shoes, right? It turns out that it’s actually not that simple. Snowshoeing techniques can range from simply strolling along a flat or gently rolling, well groomed trail at a leisurely pace, to carefully negotiating challenging and technical terrain with a great deal of effort and skill.
Before you get to the trail, make sure you are well prepared, hydrated, and that you have tried on your pack (if you are carrying one) to make sure it’s evenly packed, balanced, and a comfortable fit. For added balance and stability on the snow, use a set of poles with wrist straps. Poles will come in especially handy if you encounter deep snow or steep terrain.
When starting out, you will find that your stance is wider than usual in order to keep from tripping yourself up on the inside edges of your snowshoes, which can take some getting used to. This stance can lead to some early soreness so it’s not a bad idea to stretch your leg and groin muscles before you start.
Once you do get started you will find that snowshoeing has a relatively short learning curve.
Basic Skills
One of the first skills you will want to learn is how to get up in the rare event that you fall. The simplest approach to getting back up is to roll onto your stomach, plant your hands slightly in front of you at shoulder width apart, and use your arms to support yourself as you bring one knee forward.
Bring the other knee forward so that you are in a kneeling position, then brace yourself with your hands on your knees as you stand back up. If you have poles, you can use them to balance and push yourself up to a standing position. Do read our tips on how to select the best boots for snowshoeing for more information.
Another basic skill you’ll need is that of turning around, to change direction by 180 degrees. The easiest method is to step yourself through a tight U-turn. You might, however, find that you need to turn around more quickly due to tight space constraints.
To make a tight turn in just a couple of steps, place your outside foot forward and perpendicular to your inside foot, then lift your inside foot and rotate your body 90 degrees to place your inside foot down alongside of your outside foot. Repeat this for the other 90 degrees. With shorter recreational shoes the turnaround can be accomplished in a single pivoting step.
Making your way through unbroken snow is also a basic skill to learn. The deeper and softer the snow, the greater the difficulty and effort. Deep, soft snow requires a higher, more deliberate step, while you can get away with an easier gait over hard or shallow snow.
When snowshoeing with a group through unbroken snow, it’s best to rotate members of the group through the lead position since it can be tiring work.
In deep and soft snow there are two techniques to keep from sinking too far into the snow. Both make use of slowly placing each step and allowing your weight to compact the snow before taking the next step.
One method is to step forward, placing your heel first, then slowly rolling your shoe forward onto the toe, allowing the shoe to slowly compact the snow and distribute your weight before taking the next step.
The other method uses the same principle, but rather than rolling your weight forward from the heel to the toe, you place the outside edge of each shoe first, then roll inward until your weight is supported. This side edging method also comes in handy when traversing across hilly terrain.
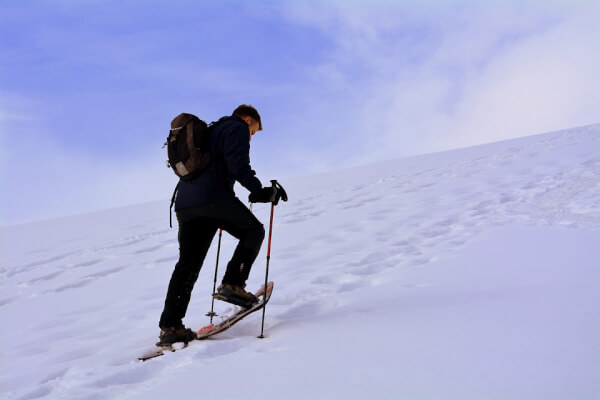
Ascending Terrain
Ascending is the term for climbing your way uphill, and it requires more practice and skill than snowshoeing on flat or gently rolling terrain. Poles come in especially handy for added support and balance while negotiating steep terrain, whether ascending up, descending down, or traversing across a hillside.
Poles will help distribute your weight and take some of the pressure off of your knees and legs, while using your arms to help steady yourself and to provide added traction. Depending on the angle of the incline and the condition of the snow, there are a number of different techniques for ascending.
Ascending up a moderate incline is relatively simple, allowing for a more or less head on approach. Directly facing the slope, place one foot forward and plant the toe claws of the snowshoe first, then slowly press down in the snow with your heel, compacting the snow for support and allowing the claws or crampons to dig in for traction.
Repeat this with your other foot, taking as short a step as necessary to maintain support and balance. You can also take small steps with your poles and use your arms to help pull yourself upward.
Another method for ascending moderately steep terrain is to use a herringbone step. This step is similar to that used by cross country skiers when ascending hills.
The toes are angled outward, placing the shoes at approximately a 45 degree angle to one another. The outside edges will dig into the snow to provide traction as you ascend the hill.
There are also two basic methods for ascending steep terrain. One is to sidestep your way up the incline. Orient yourself so that one side or the other is facing uphill, and take a wide sideways step up with your uphill foot. Place your uphill foot by sidekicking the outside edge of your shoe into the snow, keeping the shoe as level as possible.
Slowly transfer your weight onto the uphill shoe and allow the snow to compact and support your weight, while the uphill edge claws dig in to provide traction. Follow with your downhill foot, kicking the inside edge of your shoe into the snow and slowly transferring your weight back to that foot before repeating the step up.
The other method for ascending steep terrain is similar to the sidestep method, but is done facing the incline head on. Place one foot forward, kicking it deep into the snow while keeping it as level as possible. Lean forward to place weight on the toe of your shoe, allowing the front claws to dig in for traction, then follow with your other leg. The idea is to dig stair steps into the snow as you ascend.
For terrain that is too steep for either method, you can traverse sideways across the slope, keeping your weight on the uphill edges of your shoes, and again slowly transferring weight from one shoe to the next to allow the snow to compact and the edge claws to dig in.
Descending Terrain
Descending is the term for climbing downward. While the approaches to descending terrain are similar to those of ascending terrain, descending is more difficult, and poles become even more useful. For moderately steep terrain, a head on approach can be used by placing the heel of each step first, and slowly transferring your weight from heel to toe as you step forward with each foot.
Descending steeper terrain is best done using the sidestep method, and is similar to sidestepping while ascending. A descending sidestep uses the inside edge of the downhill shoe to dig into the snow and support your weight before stepping down with your uphill foot and transferring weight to the outside edge of that shoe.
It is also possible to descend steep terrain head on using snowshoes with rounded rather than pointed tails, and taking each step by kicking the tail of the shoe into the snow while keeping your weight on your heels to form a stair step in the snow with each step.
Most Importantly, Enjoy Yourself
You have learned a bit about the history of snowshoeing, and how it has impacted today’s snowshoe designs, from short and wide to long and narrow. Make sure your hands are toasty – check out our earlier review of the best backpacking gloves to give you more options.
You now have a good idea of how to select the proper snowshoe design and size for yourself based on the conditions in the field, the weight of your load, and your level of experience.
There is a reason snowshoeing is becoming one of the fastest growing sports; and that’s because it doesn’t require a whole lot of skill to get into, the learning curve is fairly short, and at a couple hundred dollars for a pair of snowshoes it’s not very expensive.
Are you a newbie? Check out our must-read article on how to choose the best snowshoes for beginners to guide you.
Featured Image Source: https://pixabay.com/photos/ascent-fatigue-snow-winter-fun-3295661/