Whether you are a seasoned outdoor survivalist or considering a casual camping trip close to home, knowing how to pitch a tent ahead of time will make your excursion much easier.
While you can’t exactly predict the weather, losing supplies in the river, or running into a patch of poison ivy, knowledge of the proper tent-pitching technique will give you peace of mind when setting up camp for the first or the thousandth time.
Knowledge is Power
While your instincts may tell you to rely on someone with lots of experience to pitch your tent for you, you never know what surprises might arise, and having your own set of skills is paramount in any activity, especially those of the outdoor persuasion.
Plus, knowing how to pitch your own tent will give you the chance to choose the very best bit of campsite all for yourself. While there are several types of tents on the market, these basic instructions will get you far no matter which brand or model you use.
Don’t Be Intimidated By Small Packages
Great things come in them, after all. How the wonderful folks at the tent manufacturing plant can fit each tent into such a small package might be one of the universe’s mysteries. Don’t let the inevitability of having to stuff your tent back into its package later spoil your confidence.
Be Safe, Not Sorry!
One of the worst things to discover upon arriving at your campsite is that all the pieces of your tent did not arrive with you. Before ever setting out on your journey, make absolutely sure that each piece of your tent is accounted for. While it is not impossible to set up a tent without every single piece, to do so is a strenuous, difficult task that we’d all be better off not attempting.
It’s important to be certain that your tent is functional before setting off as well. By setting it up once ahead of time in your house or in your yard, you’ll make sure your tent is not a dud while also getting in a practice run.
Understanding the Steps
Step 1
Before unpacking your tent at the campsite, find a level piece of land large enough to fit your tent at its full size. The spot you choose should be free of debris such as rocks, roots, and wild animal droppings – all things you wouldn’t want to spend a few nights sleeping on top of.
While small rocks and sticks may not cause you much grief when you’re out traversing the trails, they can really be a pain in the ribs when you’re trying to catch some sleep. It is also important to make sure the area on which you pitch your tent is dry and won’t turn into a swamp should some rain fall during your stay.
Step 2
After you’ve chosen a spot, unpack your satchel and spread your tent out flat, making sure to keep the bottom of the tent on the bottom. The top of the tent will feature the door and windows which, even crumpled flat, should be a giveaway for which side goes up and which side goes down.
Some tents come with what is called a footprint, a cloth or tarp that acts as an extra layer between your tent and the ground, preventing wear and tear that might occur if your tent scratches against rough terrain during your trip. If you do have a footprint, spread that out flat on the ground before spreading your tent out flat on top of it.
Step 3
Separate the various poles and metal stakes from your tent. These will give your tent shape and keep it upright, kind of like a skeleton.
Many times these will be color coded or otherwise marked letting you know which poles go together. If your poles aren’t marked, don’t fret. This just means that it doesn’t matter much which pole goes where.
Step 4
Your tent poles will need to be connected together. Most tent poles have a bungee wire of sorts that goes through the length of each pole, keeping the poles attached, if not flopping around. If your poles are not already attached in this manner, follow the instructions given for attaching the poles to one another.
Step 5
Lay the poles diagonally across the flat tent in an “X” shape to get an idea of where each pole should go. Your tent will have holes, or eyelets, where the ends of the poles are meant to be inserted. Push each pole diagonally through the eyelets and out the other respective side, making sure to slide them through the flaps at the apex of the tent.
The “X” shape will act as the skeleton of your tent, framing its shape and lifting the tent, making it three dimensional. Your specific tent may come with accessories and pieces that need to be attached to the tent and its poles. Be sure to read the instructions included in your particular tent regarding these pieces and their designated purposes.
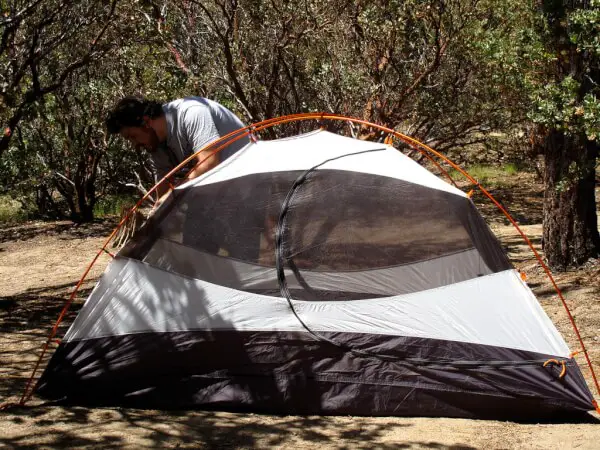
Step 6
The next step will be to spread your tent out so that the tent floor makes a square shape. It can be difficult at first to wrangle with the tent and get it into shape, so having another person help you with this step might make things easier. Eventually, you’ll be so familiar with setting up your tent that this part will be a breeze.
Step 7
Once your tent is standing in its proper shape, locate the four metal tent stakes that will anchor your tent into the ground. It can be helpful to bring a type of hammer or mallet with you to allow you to more easily break the ground.
While some soil may be soft and moist, it could very well be dry and hard a week later and there is no need to injure your hands trying to force a metal tent stake into an unforgivably solid patch of earth when a mallet will happily do that for you!
On the other hand, if the ground is too soft, your stakes might try to move around. To combat this, place the stakes into the ground at an angle of about 45 degrees, as if pointing downward in the direction of your tent.
Be careful not to bend or warp the tent stakes or they will not be as effective in anchoring your tent to the ground.
Choosing Your Tent
Following the steps above will give you a basic idea of how to set up pretty much any tent you come across. However, the list of available tent types is extensive and you may wonder which one is best for you.
Ridge Tents
Ridge tents are a tried and true type of tent and they may be what you picture when you imagine a tent. Ridge tents come in all sizes from small one-person tents (you can use the term “bivouac” to really impress your buddies) to large tents capable of sheltering entire families.
When you look at a ridge tent from the front or back, you’ll see a triangle. They are basically two triangular ends connected by a horizontal pole. Their simple structure makes for an easy setup.
However, they are usually not very tall from bottom to top so they may not be comfortable for someone who wants to spend a lot of time hanging out inside his or her tent. If you plan on using your tent primarily for sleeping, a ridge tent will work just fine.
If you find yourself in a pinch, an inexpensive way to create a ridge tent would be to find a large tarp and attach a clothesline between two trees. Spread the tarp over the clothesline, spread out its four corners, and stake them into the ground. Voila!
Keep in mind that ridge tents are much more angular than other types of tents and can more easily be knocked down by a strong bout of wind.
Pop-up Tents
Pop-up, or “quick pitch” tents are a relatively new concept in the camping world and they are truly an answered prayer for those who fear pitching tents. Though, after reading the steps above, you should be confident in your tent-pitching abilities.
Pop-up tents are fitted with a spring system. Typically they are surrounded by a restrictive band that, when removed, allows the tent to pop into its fully erect position. With some pop-up tents, you may need to toss the tent a bit in order to get it to unfold completely.
While convenience wasn’t always the name of the game in regards to camping, some pop-up tents nowadays even include solar panels that produce LED light and charging power for electronics.
Inflatable Tents
If pop-up tents weren’t convenient enough for you, inflatable tents might be. Aside from camping in an RV or trailer, often referred to as “glamping,” inflatable tents might be the easiest way to set up camp.
To pitch an inflatable tent, all you need to do is spread the flat tent out, stake the corners, turn on the air compressor, and wait patiently while your shelter grows before your eyes.
Inflatable tents are not incredibly common on campsites, however, because their air compressors make them bulky and heavy to travel with. They are also quite pricey.
Dome Tents
The popular dome-shaped tents you will see at many campsites are aptly named dome tents. They offer a more spacious interior than ridge tents. A small dome tent will come with two of the flexible poles mentioned above that cross diagonally across the top of the tent. As dome tents increase in size, so does the number of poles included.
Some dome tents meant for families even offer privacy walls within the tent itself and a center “living area” with lots of standing room. Of course, the more poles required for pitching the tent will make for more difficult and longer set up time. Dome tents also tend to get more wobbly with size.
Because of the shape of dome tents, water tends to roll down the sides of dome tents rather than pool on top. Dome tents are a good choice if precipitation is in the forecast, but a very cheaply made dome tent will not offer the protection of a higher quality model.
Geodesic Tents
Don’t worry – you haven’t found yourself in geometry class.
Geodesic tents are similar to dome tents in shape, but they have more poles crossing one another at more locations. Because of the triangular shapes in which the poles of geodesic tents meet, they have a very strong structure and weigh more than tents with fewer poles, allowing them to be sturdier than other tents on the market.
Tents with more than two cross points but fewer than five are considered semi-geodesic. Naturally, the more poles and cross points a tent has, the more heavy-duty and stable it will be.
Tents of the geodesic and semi-geodesic varieties are great for campers with a taste for the extreme. Their weight and sturdiness offer more protection from harsh winds and weather phenomena. For the top family tents in the market, check out our earlier piece on this topic.
Tent Materials
Tents can be nylon, polyester, or simple canvas. Each material has its own list of benefits and functions.
You will often see tents made out of nylon at campsites because they are light and easy to maneuver. Nylon is not the most durable material, though, so they are not a great choice for extreme terrain or weather conditions.
Canvas tents are 100 percent cotton and are breathable and tougher than nylon, making them better for a more extreme environment. Though, with added durability comes added weight. Because of how heavy canvas tents are, they are not used as widely today as they once were.
Tents made from cotton and polyester blends offer good durability without all the excess weight.
Tent functionality also depends on what coating covers the material. Common coatings include, from toughest to weakest, silicone, polyurethane, and acrylic.
Packing Up
After a few days or weeks in the wilderness, packing up your tent might seem like a melancholic transition back to civilization. It can be difficult to get such a seemingly large structure back into its impossibly tiny package.
See also: How to Fold a Tent: Easy Tips and Tricks for Newbie Campers
Firstly, be sure to unzip all the doors and windows on your tent. Remove all of the tent’s poles. If the tent is a simple pop-up or quick pitch tent, just follow those instructions because they will be short and simple. No removal required. If your tent is inflatable, deflate the thing.
The last step might be the most strenuous: fitting the tent back into its sack. If you don’t want to simply stuff it inside and hope for the best, you need to decide whether folding it or rolling it will be most effective for you. Often, tents come from the manufacturer rolled tightly inside their sacks. Following this logic, a tightly rolled tent will probably fit best in its sack.
Unfortunately, you won’t likely be equipped with the tent-manufacturing machinery that is most suited for tightly rolling tents. That’s okay. You can stuff it. At this point, you’ve gotten the hang of pitching the tent and that’s the main battle. There is absolutely no shame in winging it across the finish line.
Don’t Sweat the Small Stuff
If you still aren’t totally confident in your tent-pitching ability, go ahead and try practicing doing so a few times. Like anything else, you WILL get better at it the more you do it, and eventually, it won’t be so difficult.
Once you’ve decided on the tent that will work best for you or your family, keeping in mind these basic instructions will turn what may have once seemed like an impossible task into a simple and fulfilling experience.
Recapping the Basics
Choose a comfortable spot for your tent that won’t leave you in danger of being flooded or blown away. Then, place a barrier, such as a tarp or an included cloth footprint between the ground and the bottom of your tent to lengthen its life and keep it from getting damaged. For a great article comparing tent footprint vs tarp, check out our must-read article to find out more.
Next, locate all poles and attachments and place them accordingly in their respective spots, then stake that baby into the ground. Make absolutely sure to include enough sleeping bags and blankets for your trip. The temperature can decrease drastically during the night in the woods even in the summer months.
Now you’ve got yourself a pitched tent filled with however many or however few creature comforts you prefer along with the know-how of a seasoned camper, whether you actually are one or not. Get out there and test your skills.
Don’t let the prospect of pitching a tent keep you from enjoying the wilderness to its fullest. Pitching the tent is most of the battle, but a very small portion of the grand camping experience.
Before your next trip, check out our article on how to select the best 6 person tent to give you more options.
Featured Image Source: “Pitching the Tent” by OctopusHat is licensed under CC BY-SA 2.0