Choosing a solar charger for a weekend trip is simple. Strap any panel to your pack, point it at the sun, done. But thru-hiking the Appalachian Trail? That’s a completely different problem — and one that most gear review sites get wrong.
I spent five months on the AT in 2026, and I can tell you right now: the charger that gets five stars on Amazon because some guy tested it on his patio in Arizona is going to let you down somewhere around the Smoky Mountains. Dense hardwood canopy, overcast skies for days at a stretch, and a pack that’s already pushing your weight limit. That’s the reality.
This guide is for the long-distance hiker who needs to keep a phone, GPS, and maybe a headlamp battery alive over weeks and months on trail. I’ve tested these panels in the conditions you’ll actually face — partial shade, cloudy mornings, strapped to a moving pack. No lab results. No rooftop tests.
Why Thru-Hikers Need a Different Solar Charger
Tree Canopy and Partial Shade Reality
Here’s the thing nobody tells you before your first thru-hike: the AT is a tunnel. Not always, but often enough to wreck any charging strategy built around direct sunlight.
From Georgia through Virginia, you’re walking under a thick canopy of oak, poplar, and maple for hours at a time. Even on sunny days, your panel might only catch dappled light filtering through leaves. I logged my panel output obsessively for the first two weeks — on a clear June day in North Carolina, my 21W panel was producing maybe 4-5 watts under the trees. That’s a fraction of its rated capacity.
Compare that to the PCT, where you’re above treeline or in open scrub for massive stretches. Or the CDT’s high ridgelines in Montana. AT thru-hikers are playing solar charging on hard mode.
Weight vs. Wattage Trade-Offs on Long Trails
Every ounce matters when you’re carrying your life for 2,190 miles. But here’s where it gets tricky — a tiny 5W panel weighs almost nothing and produces almost nothing under canopy. A beefy 28W panel actually works but adds nearly a pound to your kit.
My rule of thumb after a full thru-hike: aim for the 15-28W range and keep total panel weight under 20 ounces. Anything less than 15W and you’ll be hunting for wall outlets at every trail town. Anything over 28W and you’re carrying dead weight for marginal gains.
What to Look for in a Thru-Hiking Solar Charger
Panel Efficiency in Indirect Light
This is where the real money is. Monocrystalline panels outperform polycrystalline in low-light conditions — that’s not marketing, it’s physics. But the charge controller matters just as much.
MPPT (Maximum Power Point Tracking) controllers squeeze more usable power out of inconsistent light than basic PWM controllers. Think of it this way: PWM is like a light switch — on or off. MPPT is like a dimmer that constantly adjusts to find the sweet spot. Under full sun, the difference is maybe 10-15%. Under the AT’s canopy? It can be 25-30% more actual charging power. That gap is the difference between a full phone battery and a dead one.
Durability Over Months of Daily Use
Your solar panel lives on the outside of your pack. It’s getting rained on, scraped against trees, dropped on rocks, and baked in the sun. For five months straight.
I watched a guy’s cheap Amazon panel delaminate in week three. The protective film peeled back, moisture got in, and output dropped to basically zero. He mailed it home from Hot Springs and just started charging at hostels instead.
Look for panels with ETFE coating rather than PET lamination. ETFE is tougher, more scratch-resistant, and handles UV degradation better over time. It costs more. It’s worth it.
Attachment Systems for Pack-Mounted Charging
Grommets and carabiners are the standard attachment method, and honestly, they work fine for most panels. But pay attention to how many attachment points you get and where they’re placed.
You want at least four corner grommets so you can secure the panel flat against your pack’s back panel or brain. Panels that flop around catch wind and fold over — which means zero output until you notice and fix it. I used small S-biners and ran a bungee cord across my panel as insurance. Took thirty seconds and saved me a lot of frustration.
Top Solar Chargers for Thru-Hikers
Best Overall: Nitecore FSP100 (28W Flex Panel)
This panel changed my thinking about what’s possible on trail. The FSP100 is a flexible monocrystalline panel rated at 28W, and it actually delivers close to that in good conditions. Under partial shade on the AT, I was consistently getting 8-12W — which is enough to meaningfully charge a power bank while hiking.
Key Specs:
- Weight: 13.9 oz (394g)
- Output: 28W max, USB-A + USB-C
- Dimensions: 37.4 x 10.6 inches (unfolded)
- Price range: $80-100
- Charge controller: MPPT
What makes the FSP100 special is the combination of high wattage and low weight. Under 14 ounces for 28W is absurd. The flex design means it conforms to your pack rather than sticking out like a rigid board.
The downsides? It’s a single panel, not a folding design, so it’s essentially a long strip. Attaching it neatly takes some fiddling with your pack’s lash points. And the USB-C port tops out at 18W, which is fine for phones but slow for larger devices.
For the AT specifically, this is my top pick. The MPPT controller and efficient cells mean it punches above its weight class in the dappled light you’ll actually encounter.
Best Ultralight: BioLite SolarPanel 5+
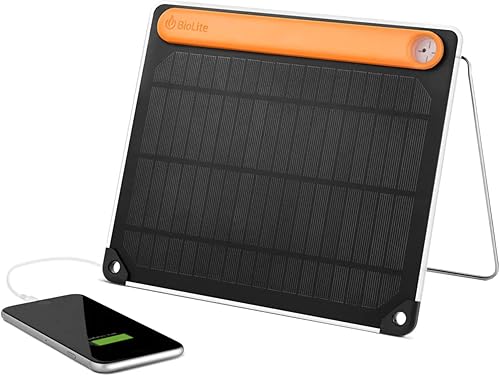
If you’re counting grams and willing to accept slower charging, the SolarPanel 5+ is hard to argue with. At just 13.7 oz with its integrated 2200mAh battery, it’s lighter than most standalone panels — and that built-in battery is the secret weapon.
Key Specs:
- Weight: 13.7 oz (390g) including built-in battery
- Output: 5W max, USB-A
- Dimensions: 10.1 x 8.2 inches
- Price range: $55-70
- Built-in: 2200mAh buffer battery + sundial alignment tool
The integrated battery acts as a buffer, storing trickle charges that would otherwise be too weak to push into your phone. Those moments of partial sun that a regular panel would waste? The BioLite captures them. Over a full day of hiking, that buffer adds up.
The sundial is a genuinely clever feature — a small kickstand casts a shadow on alignment marks so you can angle the panel for maximum output during rest stops. Sounds gimmicky, actually useful.
But let’s be honest about limitations. 5W is 5W. Under canopy, you might get 1-2W actual output. This won’t keep up with heavy phone use. It’s best paired with a separate power bank and conservative screen time. I’d recommend this for minimalist hikers who aren’t running GPS tracking all day or for people using it alongside town charges.
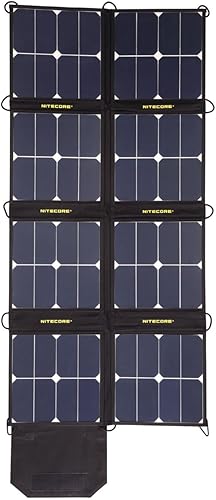
Best for Canopy Trails: Goal Zero Nomad 20
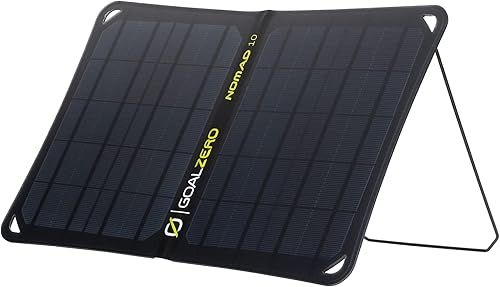
Goal Zero’s been in the portable solar game longer than almost anyone, and the Nomad 20 reflects that experience. This is a folding panel built specifically for inconsistent light conditions.
Key Specs:
- Weight: 17.6 oz (499g)
- Output: 20W max, USB-A + 8mm port
- Dimensions: 12 x 8.5 inches (folded)
- Price range: $100-130
- Charge controller: Smart IC with auto-restart
The standout feature for AT hikers is the auto-restart function. When a cloud passes or you walk through a shady patch, most panels lose their connection to your device and don’t resume charging automatically. You have to unplug and replug. The Nomad 20 reconnects on its own. On a trail where light conditions change every few minutes, that’s not a small thing.
The 8mm output port lets you connect directly to Goal Zero’s Sherpa power banks and Flip batteries, which is nice if you’re already in their ecosystem. But the USB-A port works with anything.
At nearly 18 ounces, it’s not the lightest option. And the folding design means it doesn’t lie as flat on your pack as the Nitecore. I’d pick this over the FSP100 if I was hiking sections with especially dense canopy — like the mid-Atlantic states — and planned on doing a lot of stop-and-charge rather than charge-while-walking.
Budget Pick: BigBlue 28W
Sometimes you need a solar charger and you don’t want to spend $100+. The BigBlue 28W is the answer, and it’s genuinely better than it has any right to be at this price.
Key Specs:
- Weight: 20.5 oz (581g)
- Output: 28W max, 3x USB-A
- Dimensions: 11.1 x 6.3 inches (folded)
- Price range: $50-65
- Panels: SunPower monocrystalline cells
Three USB ports means you can charge your phone, your power bank, and your buddy’s device simultaneously. The SunPower cells are the same premium cells you’ll find in panels costing twice as much. And it works. Under direct sun, I measured output within 2W of its rating, which is better than some expensive competitors.
The catch — and there’s always a catch at this price — is weight. At 20.5 ounces, it’s the heaviest panel on this list by a good margin. It’s also bulkier when folded. And the charge controller is basic PWM, not MPPT, so canopy performance takes a real hit compared to the Nitecore.
If you’re section-hiking rather than thru-hiking, or if you’re on a tight budget and willing to carry the extra weight, this is a no-brainer. For a Georgia-to-Maine thru-hike where every ounce adds up over months? I’d save for the Nitecore.
Comparison Table
| Charger | Weight | Wattage | Price Range | Best For | Controller | Canopy Performance |
|---|---|---|---|---|---|---|
| Nitecore FSP100 | 13.9 oz | 28W | $80-100 | Overall thru-hiking | MPPT | Excellent |
| BioLite SolarPanel 5+ | 13.7 oz | 5W | $55-70 | Ultralight setups | Buffer battery | Good (with buffer) |
| Goal Zero Nomad 20 | 17.6 oz | 20W | $100-130 | Dense canopy sections | Smart IC | Very Good |
| BigBlue 28W | 20.5 oz | 28W | $50-65 | Budget/section hiking | PWM | Fair |
How to Maximize Solar Charging on Trail
Optimal Panel Placement on Your Pack
I’ve seen hikers strap their panel to the top of their pack brain, to the back panel, draped over the top like a cape — everyone’s got a theory. After way too much experimentation, here’s what actually works:
Back panel, centered, secured at all four corners. Your pack’s back panel faces the sky at roughly the angle of your lean, which on most hikers is 15-25 degrees from vertical. Not ideal for direct sun, but it keeps the panel stable and out of the way. During lunch stops, pull it off and prop it against your pack at a steeper angle toward the sun.
One trick that made a noticeable difference: I flipped my panel upside-down when hiking northbound in the morning. Since the sun was behind me and slightly south, the panel caught more light angled backward than it would have facing forward. Small optimization, but it added up.
And stop checking your charging status every five minutes. Unlocking your phone to check the battery percentage uses more power than you think. Check once at lunch, once at camp. Trust the process.
Power Bank Pairing Strategy
Your solar panel shouldn’t charge your phone directly while hiking. Full stop. The inconsistent power from a moving, partially shaded panel makes direct charging inefficient and potentially bad for your phone’s battery health.
Instead, charge a power bank during the day and charge your phone from the power bank at night. A 10,000mAh bank is the sweet spot for most thru-hikers — that’s roughly 2-3 full phone charges. 20,000mAh if you’re running GPS, taking lots of photos, or going long stretches between towns.
I carried an Anker 10,000mAh (6.4 oz) and typically hit town with 40-60% bank capacity remaining. That buffer meant I never felt anxious about power, even during a four-day rainy stretch in Vermont where my panel produced basically nothing.
Real Trail Performance: AT vs. PCT vs. CDT
I’ve only thru-hiked the AT, but I’ve done long sections on the PCT and CDT. The solar charging experience is dramatically different on each.
AT: Hardest trail for solar. Dense canopy from Georgia through New England. You’ll get maybe 3-4 hours of usable sun per day on average, often in broken patches. MPPT controllers matter here more than anywhere. Expect 30-40% of rated panel output as your daily average.
PCT: Solar paradise by comparison. Long exposed ridgelines in Southern California, the Sierra, and Oregon. Desert sections in the south give you 8+ hours of unobstructed sun. Even a cheap 10W panel can keep you charged. Most PCT hikers I’ve talked to say solar works almost too well — they end up with full batteries by noon.
CDT: Mixed. The New Mexico and Colorado sections have plenty of sun. Montana’s forests are thinner than the AT’s East Coast hardwoods but still provide significant shade. I’d put CDT charging conditions somewhere between AT and PCT, leaning toward the easier side.
If you’re planning an AT thru-hike and reading reviews from PCT hikers saying a 10W panel was plenty — ignore them. Different trail, different ballgame.
Caring for Your Solar Panel on Trail
These are simple devices, but a little maintenance extends their life dramatically.
Wipe the panel surface with a damp bandana every few days. Dust and pollen build up faster than you’d expect and cut output by 10-15%. Don’t use soap — just water.
Check your cable connections weekly. Trail vibration loosens USB connections over time, and a slightly unseated plug can halve your charging speed without any visible sign of a problem.
Store the panel inside your pack (or in a pack pocket) during rain. Yes, most panels are rated water-resistant. But water-resistant after five months of daily use isn’t the same as water-resistant out of the box. Seams degrade, coatings wear. Don’t push it.
If a panel gets wet, dry it off before connecting it to any device. Water in USB ports causes corrosion and short circuits. I carry a small piece of chamois cloth specifically for this.
FAQ
Can I charge my phone directly from a solar panel while hiking?
You can, but you probably shouldn’t. The fluctuating power as you move through sun and shade causes your phone to constantly start and stop charging, which generates heat and wears the battery faster. Charge a power bank instead, then charge your phone from the bank at camp. Your phone battery will thank you over a five-month hike.
How many watts do I actually need for thru-hiking?
For the AT specifically, I’d say 20W minimum rated output. That translates to roughly 6-10W real-world output under canopy — enough to meaningfully charge a 10,000mAh power bank over a full hiking day. For the PCT or CDT, you can get away with less. A 10W panel works fine on exposed western trails.
Do flexible panels last as long as rigid ones?
In my experience, flex panels lose about 5-10% efficiency per year of heavy use. Rigid panels hold up better long-term but aren’t practical for backpacking. For a single thru-hike, a quality flex panel will perform well the entire time. If you’re planning multiple thru-hikes over several years, budget for replacement.
Is MPPT really worth the extra cost?
On the AT — absolutely yes. The 25-30% efficiency gain under partial shade conditions is real and makes a measurable difference in daily charging. On the PCT with its abundant direct sun, the advantage shrinks and probably isn’t worth paying a premium for. Match your controller to your trail.
Should I bring a solar panel AND a large power bank, or just a bigger power bank?
Depends on your resupply strategy. If you’re hitting towns every 3-4 days, a 20,000mAh power bank without a solar panel might be simpler and lighter. If you’re doing longer stretches between resupply — some AT sections have 5-7 day gaps — a solar panel plus a 10,000mAh bank gives you renewable power that a big battery can’t match. I carried both and never regretted the panel weight.
Do solar chargers work in rain or heavy overcast?
They work, but barely. Expect 5-10% of rated output under heavy cloud cover and essentially zero during rain. This is why a power bank buffer is non-negotiable — you need stored energy to get through multi-day weather events. During a three-day nor’easter in New Hampshire, my panel produced enough to maybe charge my phone 10%. The power bank carried me through.
The Bottom Line
For most AT thru-hikers, the Nitecore FSP100 is the panel I’d recommend without hesitation. The weight-to-wattage ratio is the best available, the MPPT controller handles canopy conditions better than anything else I’ve tested, and it’s survived thousands of miles on various packs without falling apart.
If your budget is tight, grab the BigBlue 28W and accept the extra weight. If you’re ultralight-obsessed and disciplined about power usage, the BioLite SolarPanel 5+ paired with town charging can work. And if you’re specifically tackling the densest canopy sections, the Goal Zero Nomad 20’s auto-restart feature is genuinely valuable.
Whatever you pick, pair it with a quality 10,000mAh power bank, charge the bank during the day, charge your devices at night, and wipe the panel down regularly. That system will keep you powered from Springer to Katahdin.
Featured Image Source: Pexels