Starting a fire with sticks in the wilderness is a fundamental element of the survivalist’s repetoir, but is also one of the trickiest skills to master. The caveman who discovered fire must have been pretty handy with some twigs.
This article will detail the necessary skills for starting a fire in the wilderness when you have nothing but what nature has provided at your disposal. However, making a fire with sticks alone is a difficult and uncertain business, and a very difficult skill to master.
Many more prepared wilderness masters will never leave home without a fully stocked fire-starting kit.
I would highly recommend never leaving yourself in a situation where you must start a fire without the aid of any basic equipment.
See also: How to Start a Campfire: Methods and Styles to Improve Your Campfire Experience
You might think yourself very cool, going out into the wilds with only your wits with which to start a fire, but you will end up more than cool, you will end up freezing. Bring matches please.
In this article, I will show you some of the best ways of starting a fire with sticks alone, but will also detail all of the easier ways of starting a fire.
Whatever method you choose to get your fire burning, the key to success is with good preparation.
Preparing for Your Fire
Please be aware that starting a fire by any method is dangerous. Burns can and do happen, and sustaining a burn in a wilderness situation is something you definitely want to avoid. Take necessary care when starting your fire.
Pick a safe spot, ideally in a clearing and away from overhanging branches, or dry grass or forest-litter underfoot, which could catch light. Try and find a sheltered area, and take note of the strength and direction of the wind.
Prepare your fire pit by gathering stones and ringing your fire pit with these stones to prevent the fire from spreading beyond your control. The ring of stones also has the advantage of staying warm after your fire has finished burning.
Ensure you have water on hand (as in right beside you) to put out your fire when needed. If you do not have enough water to put out a fire, you should not be lighting a fire!
Do not leave your fire unattended and do not fall asleep.
Please make sure you are more than familiar with all aspects of fire safety, as well as local fire policy, before even dreaming of lighting a fire. If you are unfamiliar with lighting and controlling fires, leave it to an expert.
Before attempting to light a fire by any method, you need to have all of your fire-building materials ready to go.
Picking Tinder, Kindling and Firewood
You will need to have all of your fire-building materials on hand before starting your fire. Take time to gather the proper materials, and in sufficient amounts. Start a little further away from your campsite so that you do not strip the area.
Tinder
Search around for any material that is dry, light and fluffy – this can be your tinder, which will catch an initial spark and begin your fire. Gather a small pile of tinder for yourself, and keep your tinder supply dry as a bone. Starting a fire with sticks requires careful and meticulous tinder selection.
Wood shavings, cedar bark, dryer lint, char cloth, and dry grass are all examples of tinder.
Top tinder tip: Tampons. Tampons are a secret weapon when it comes to fire starting. They come in water-tight packaging, are lightweight, easily bought, and make excellent tinder.
You can take them out of their waterproof packaging and rip up the tampon itself into small, fluffy bits that will easily catch alight.
Kindling
Gather a pile of kindling. This will be introduced little by little once your tinder has caught.
The key with kindling is to keep your pieces small, so as not to smother a little flame. Small twigs work well as kindling.
Fuel
The wood you choose to fuel your fire must also be carefully selected. You will need to collect a good deal of firewood before getting your fire started. Collect at least twice as much wood as you think you will need.
Choose only branches from the ground – do not cut branches off trees for your own ends.
The wood you collect for your fire does not need to be very thick either. The logs used for indoor fires do not work as well outdoors, and branches of smaller diameter are easier to control.
Once you have a good-going flame, your fire can be built up by placing your branches around the flame in a ‘tee-pee’ or ‘woodhut’ fashion.
How to Prepare Yourself So That You Do Not Have to Light A Fire with Sticks
As I have mentioned at the start of this article, many people never venture outdoors without bringing a fire-starting kit – in the same way that it is essential to always pack a first aid kit.
A fire-starting kit should be waterproof to keep its contents dry, and should contain at least one method for starting a fire and ideally an element of kindling also.
Here are some of the best things to pack to make sure you will stay warm and content on your adventures:
- A dry bag: Dry bags come in all sorts of different sizes. A small dry bag makes an excellent place to store your matches or lighter. An empty drybag is also a useful home for any kindling you collect.
- A firestarter flint: you can buy this small and amazing piece of equipment in any outdoor store. They are usually very inexpensive, produce sparks easily, and weather a little damp much better than matches. The fire starter flint kit often includes a magnesium fire starter rod, and a striker. They take up hardly any room or weight in your bag and can start a fire in seconds.
- Matches: they cost a pittance and are a basic wilderness tool. If you don’t have a flint please bring some matches. Many people run into difficulty when their matches get lost or become sodden, so please keep them packed away safe and dry. For the best waterproof matches you can use, see our earlier article on this topic.
- A lighter: again, inexpensive and lightweight, I really don’t see much of an excuse for leaving home without a lighter or a box of matches.
- Magnifying glass: this is where things get a bit more innovative. If you will be venturing out in a land with a sunny climate, a magnifying glass can help you to get a fire going.
Use it to train the rays of the sun on a small bundle of kindling. You will have to exercise patience, but eventually this method can help you to produce a spark.
Spreading a little water on the lens of the magnifying glass can help to heighten this effect. I have heard that the lens of a pair of spectacles or binoculars can also be used in this fashion, so keep this in mind also.
How to Start A Fire with Sticks
The hand drill
This method is pretty labour-intensive, but is probably the most straightforward way of getting a fire going with no equipment.
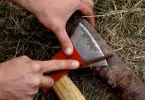
Find a piece of hard, flat wood, and make a notch in it. If you remembered to bring your knife even though you forgot your matches, then good for you, you can use your knife for this. If not, use a sharp stone like the wild thing you are.
Then find yourself a dry stick that fits snugly into the notch. The stick should be comfortably long and sturdy enough so that it doesn’t bend under your rotational force.
To effectively make an ember, your drilling stick should be of a harder material than your flat base wood.
You will also need to gather some dry tinder and kindling. Many people like to keep a dry piece of bark right beside their notch as they use their hand drill, so that they can easily transfer the first embers to the bark.
Where I live, finding a dry stick and a dry piece of wood usually proves very challenging. However, you will most definitely not get a fire going if your equipment is even slightly damp, so spend time choosing your stick and block carefully. You are in no rush here; this method is going to take ages.
Roll the stick between your palms, rotating the base of the stick in the notch. Do this with enough vigor and precision, and you may generate enough friction to produce a spark. The spark will hopefully catch within your notch and you will see smoke being produced.
Fan your hand gently over your notch to introduce oxygen and encourage a flame, and from there you can introduce your tinder. Blowing on your flame too early will only serve to extinguish it, so make sure to be gentle.
The Bow Drill
If you are feeling fancy, and like the idea of the hand drill but want to spruce it up a bit, the next step is the Bow Drill. The bow drill can be more efficient at producing flame than the hand drill, and allows you to keep your fire-starting efforts up for longer without getting worn out.
Again, it is essential that all of your equipment is dry.
This method begins as for the hand drill method; with a dry stick and a dry block of wood. Once again, a notch is chiselled into the block of wood and your stick is inserted snugly into the notch.
Many people begin bow-drilling by simply hand-drilling into their notch to ‘burn’ it – which will produce a ‘coal’ within their notch which is more likely to catch alight.
Once you have completed this step, you must then find a curved stick to use as your bow – this stick must be sturdy enough for you to move back and forth with vigor, and not so big or so small as to make the process uncomfortable.
Source yourself some string in any way you can. In the spirit of being prepared, I love bracelets made from coiled rope. These can be bought in most outdoor shops and are useful in a number of situations.
You can also make a bracelet of your own from thin rope by simply daisy-chaining the rope up (similar to how a rock-climber would coil a sling) and fastening it around your wrist (or your ankle if you want to bring wilderness-chic to the next level).
If you have forgotten your rope bracelet as well as your knife and your matches, you can use a shoelace. If your shoes have no laces, you may have to rip a small strip of material from your clothing and fashion it into a string.
The string is tied taut to either end of your bowed stick, and looped around your central (original) stick once. The bow stick should now be perpendicular to your central stick, and your central stick resting in your notched wood.
Of note, at this point, many advocates of this method suggest cutting a small v-shaped ‘chimney notch’ in your base piece of wood. This chimney notch acts as a narrow channel between your original notch where your stick is rotating, and the outer edge of your piece of wood. It allows oxygen to be introduced to your embers, and provides a space for the ‘coal’ you are producing to collect,
Finally, find a stone which fits comfortably in your palm. This is placed on top of the central stick and will allow you to stabilise your stick in its notch, as well as exerting enough downward force to maintain friction.
The idea is that one hand can be used to move the bow stick back and forth quickly, while the other hand rests on the stone, maintaining the position of the central stick.
The bow string needs to be kept perpendicular to the central stick, and fully horizontal – ie parallel to the ground to generate maximum output.
Eventually, as you work, black powder will collect in your ‘chimney notch’ if you have made one, and this can act as ‘coal’ and catch embers. Once this is producing smoke, you can fan it gently with your hand until you have created a flame sturdy enough to transfer to your tinder.
In theory, this method can allow you to drill faster than the hand-drill method, and it should take less time to generate a spark. However, life does not go according to plan, and both the hand-drill and bow-drill methods should come with a fair warning that they are an inherently difficult and frustrating way of getting a fire started.
The fire-plow
Coming from a country where we annually celebrate all things plowing-related with a national plowing championship, the name ‘FIRE PLOW’ sounds pretty cool to me.
This is another way of generating fire from wood/sticks alone.
As for both of the other methods, you will need a base-block of hardwood, as well as a sturdy, dry stick.
Instead of using your knife/sharp stone to dig a notch in your base-block, a long groove is chissled out, stopping sort of the end of the block.
The base-block can be placed between your feet, and some nice dry tinder is stuffed into the far end of the groove. The near-end of the base-block can be propped up slightly on a stone so create an incline.
Your sturdy stick is then moved back and forth within the long groove.
Some people advocate this method as more rational than the drilling method, as you are able to use your upper body strength to put more force behind your friction points.
Either way, keep moving your stick over and back within the groove until a spark is eventually produced. Ideally, the tinder you have placed at the base of your groove will catch and you will be able to introduce some kindling and start a fire. Again, this is a long and difficult way of starting a fire, but it can be done.
So there you have it – three popular methods of starting a fire with sticks.
For more useful tips on how to start a fire from scratch, see our article that shows you how.
Final Words
Remember, when extinguishing your fire to first drown it with water, and then mix the ashes with soil. Make sure that everything is wet and do not leave your fire-area until you are entirely happy that the fire is fully extinguished. After a while has passed, feel the remnants to ensure they are cold to the touch. It is always a good idea to avoid starting forest fires.
Finally always remember that when it comes to the great outdoors, Leave No Trace is the order of the day. Take all of your equipment with you and clear away your fully extinguished fire pit.
Enjoyable wilderness adventures – as well as comfortable camping holidays – are all about being prepared. However, wilderness survival is about adapting to situations you could not have prepared for. See our earlier piece on how to choose the best fire starter sticks to guide you.
The knowledge of starting a fire from sticks alone may not play a huge part in your average adventure weekend, but it may be crucial at a time when a wilderness survival situation rears its head.
Featured Image Source: https://unsplash.com/photos/IpaDEVMct8I