An axe is an essential tool for today’s woodsman, just like in the olden days. With only this simple tool, you can build a cabin, a bobsled or a fence. And you can keep yourself warm with the firewood that you chop without using any other tool.
Working using a dull axe blade is dangerous, and you should always avoid it. Keep your axe in the best shape possible. It’s essential that you learn the tools and techniques on how to sharpen an axe in order to do that.
And as it is with any tool made for cutting, proper use and sharpening will save you a lot of time and effort.
There are a lot of ways to do this depending on whether you wish to fell a tree, smooth planks, or shave the hair off a rawhide strip. A sharp axe protects you from injuries that may occur from an axe head bouncing off a log or a glancing shot.
See also: Survival Hatchet Multi-Tool: The Perfect Tool for Your Next Camping Trip
If you are new to using axes, you may have never sharpened one before. However, after some time and effort you’ll be able to get it figured out. You will have fun, and it’s a great way to end a wood cutting session.
Safety Tips
Sharpening an axe is an awkward and a dangerous task. You are forced to grip the axe in many strange ways, applying pressure using a file to a curved surface which can cause the file to skate or slip.
You need to put the following in mind when sharpening your axe:
- Always wear thick gloves. Tough, cut proof gloves work best. Your tools may slip, and you could cut yourself. Axes are designed to chop through hardwood. Your flesh will provide no resistance, therefore it’s advisable that you always be protected from any injuries.
- The technique for sharpening an axe is different from sharpening a knife. When sharpening a knife you have to move the knife over the sharpener particularly with bench stones. When sharpening an axe, you should always move the sharpener over the axe. The axe should not move, it’s mostly your hands that are at risk in that case.
- Avoid sharpening in your lap. A cut to the femoral artery is extremely plausible in this instance and it’s extremely dangerous. If at home, sharpen on a table with your legs underneath. While in the field, kneeling and keeping the axe head high is the safest.
Check out our article on basic camping safety tips before you embark on your next trip to stay protected.
Sharpening Equipment
There are both “purpose made” and “widely available” materials.
You have to understand that you don’t need to use professional equipment to achieve professional standard during sharpening. You have a choice to use any of the tools at your disposal.
- Metal bastard file 12 inches. These come in a single or double cut. Get a single cut file at least 10” long. Purchase a handle or make one, so you’re not holding onto the metal tang.
- Axe stone. Look for one that has two grits and can be used when dry. You don’t want to be messing with oil or water when you’re out in the woods and your axe needs a quick fix.
- A mounted vice: You’re going to use this to hold the axe head in place while you’re working.
- Leather strap: Endeavour to find a wide, real leather belt.
- Sandpaper and steel wool: For initial cleaning of the axe.
- Rags: For polishing the blade after removing rust.
- A sharpening stone: This is for a finer edge than the file gives.
- Gloves: For getting a firm and steady hold on the axe when working.
- A wire brush: Used to clean the file.
- Sharpening oil or water: Are needed to be used with a stone.
- Metal polishing paste.
Sharpening Techniques
You can use different sharpening techniques depending on the type of axe or its intended purpose. The dullness of your particular blade is put into consideration as well.
Using a belt sander
This is a mechanism which involves an electric motor on top of a continuous belt. It’s coated with the abrasive material, and it is driven by rollers lengthwise. The sanding belt is moderately wide, equal to the width of your hand.
A dust collection bag is on one side of the belt sander. Typically, one of the two handles comes fitted with a power trigger. They come in various types including vertical, bench, table and hand belt sanders. The most recommended model for sharpening an axe is the table design since it allows you to make some unique settings.
You get the most precise angle and edge sharpness with correct settings made to the axe and sander. Try locating the pivot of your axe and then drill a small hole on both sides. Make sure the table model you have selected has a shorter work support table.
Drill a hole in the middle of the support table and attach the fine piece of metal with the help of a screw, a nut and some washers. The sharp object needs to be looking up.
You then place the connection point on the sharp object, to make the pointing object supports your axe’s head. Gently lower the bevel to land onto the belt. The belts can be categorised in the following: 120 grit, 600-grit, 800-grit and 1,000-grit.
Which kind of belt you use depends entirely on the bluntness and the angle of your blade. Once you have powered on the machine, push the edge smoothly on the belt from right to left so that you achieve the desired sharpness and angle.
Safety measures when using this technique:
- Avoid running on the machine with flapping
- Avoid overheating by making the blade move fast on the belt.
- Support the edge using your hand so that it’s not thrown off towards you.
- Wear safety glasses whenever the sander is in operation.
- Discard excessive rounded belts.
Using an angle grinder
It’s a versatile sharpening tool possessing ample finishing possibilities. It comes with different attachments connected to one end. The best model is one that possesses a next generation motor to deliver the finest power to weight ratio.
You install it with a heavy duty dust ejection system. For efficient ejecting of damaging debris and dust, that may get into the machine. Make sure it has oversized brushes along with a large spiral bevel kit for a double brush life and high transmission.
The most suitable one has a One-Touch Guard to offer 360° rotation with a single action. Your angle grinder should come with a grinding blade in place.
More desirable equipment includes; a bucket containing cooling water; abrasive needed for removing rust on your axe; a vice to hold the axe in place; protective glasses, gloves and ear muffs; a compass and a pencil; a drill; plus a file.
At first, you should remove any forms of rust. Afterwards, determine the pivot point and draw the correct radius on the bevel or cutting edge. Place the poll end in the vice then lock it. Make sure that you have strategically placed the head in the vice.
It’s positioned in a way that you will be able to do the angles with ease because you need to maintain the “true radius” you had initially established using the compass.
You have to make sure that you cool your blade very often. Doing this will avoid damaging the quality of the metal. When grinding the blade, try as accurately as possible to maintain the angle. You will achieve this through looking at the radius and remembering to cool the blade from time to time.
Safety precautions when using an angle grinder:
- The angle grinder has to be fitted with a wheel guard to help keep sparks out of your face.
- Keep away any flammable objects like papers or loose clothes in the proximity of your working table.
- Ensure maximum concentration to avoid injury.
- Put on glasses or a full-face shield.
- Wear thick gloves
- Use ear protection.
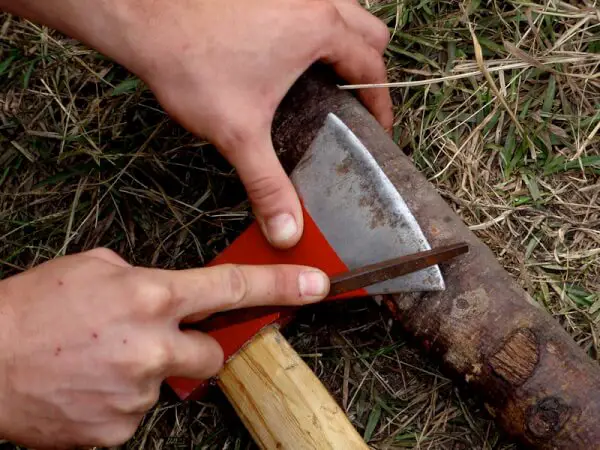
Sharpening using a hand file
The best hand file to use is the 12-inch mill bastard file. The file should weigh at least nine ounces. It should also be relatively large for easy filing. Use a single cut file and make sure you buy an excellent grip handle.
Clamp the axe to the bench at a comfortable height. Put on gloves to protect your hands. Because you need to file into the edge of the axe, not away from it, you need to wear gloves in case of a minor slip.
Always file into the edge, toward the centre of the axe handle, because this creates the least burr to remove on the other side. The single-cut file sharpens only on the push stroke. Lift it away from the axe head on the return stroke.
If you “saw” with your file, it will fill with metal particles. It will not cut properly, and it can also be ruined as the file edges are peened over.
When sharpening, always use a fan-shaped effect on the cheek of the axe. File back for a distance of approximately 2 to 3 inches from the cutting edge right at the middle point of your axe. Work all the way from the cheek down to the real edge, keeping a rounded profile.
Stop filing after you have filed one side so that a burr of metal is felt on the back side.
Occasionally, brush the metal particles away from the file with a file card. Always store and transport your files, to protect them from each other and other metal tools. Banging them together will dull their edges.
File the opposite side by doing the same steps. Unclamp the axe and use the stone to remove any debris and fine tune the blade. Rub the axe using oil and beeswax. You should store it in a leather sheath to avoid rusting.
Hand file safety:
- Always wear protective gear.
- Avoid using a loose vice.
- Make sure the file you are to use is attached to a handle.
- Use file guards: These help keep your fingers away from the sharpened axe blade.
Sharpening Procedures
It is crucial to identify and follow the bevel of your axe so that you retain the original shape of the blade. Maintain strong and continual pressure on the sharpening tool while sliding it back and forth against the blade. Also, move at the proper angle to ensure maximum sharpness and efficiency.
If your blade is rusted or requires polishing
When your blade is heavily rusted or needs polishing, it’s recommended that you do this before sharpening the blade. This step is not very essential but will help you guarantee maximum effectiveness.
It will also contribute to restoring the aesthetic quality of the blade. You should repeat this process always. Your axe will be looking polished and in pristine condition always.
To remove the rust, start with a rust eraser or steel wool. If you need polishing, use sandpaper. It is ideal to have a pool of options varying from coarse to fine grit. Beginning with the coarsest sandpaper, firmly rub the paper onto the blade.
Make sure to move in a single direction. It is to create an even and smooth surface. Do the process again using sandpaper of finer grit. If rust still exists on the blade, go over the areas once more with even finer grit sandpaper.
After all the rust is removed, you can then polish the blade with a metal polishing paste and a rag.
When the blade needs heavy sharpening
Blades which are particularly dull or have nicks or grooves that need to be heavily sharpened and smoothed out, you need to use a flat, fine-toothed file. An emery wheel can also be used. It’s vital to let the blade often cool so as not to stress or weaken the steel. Too much heat may cause steel to become fragile or tempered.
You should keep a slight amount of pressure on the blade. Move it steadily back and forth against the sharpening tool. It is important the pressure applied is smoothly distributed so to get smooth results.
If the blade of the axe you have has a curve, follow the natural shape of the bevel. Alternately, if your blade is straight, the entire bevel has to be securely pressed onto the file or wheel. Do the process on the other side of the blade.
A which blade needs minor sharpening
If the blade of your axe just needs minor sharpening, or if you have already successfully smoothed out nicks and dull edges, use a whetstone or sharpening tool. It has to be with a harmonious and coarse side.
Be sure to have your whetstone lubricated. Water should be used with sandstone, clay or similar sharpeners. Alternatively, oil is utilised for oil-based whetstones. An axe grinder may be a better alternative if available.
Secure your axe in a way that you will be able to keep a safe and secure grip on the stone. If you decide to use a grinder, your body weight should be used to create natural pressure against the axe. When using a stone, start off with the rough side of your blade.
Beginning at the end, use strong, steady strokes while moving back and forth in small, circular motions. Be vigilant to maintain the natural shape of the edge. Repeat this process on both sides of the axe until they are consistently and efficiently sharpened.
If executed correctly, an overhang or burr will accumulate on the edge. You create this when the steel strips away at the edge during the tapering process, producing a thinner and thus sharper edge. The burr or overhang is less but can be felt with your finger and must be appropriately discarded.
When removing burr
To eliminate the burr that builds up on the edge, you need to use the smoother side of the whetstone. It’s done after properly lubricating your whetstone. You have to use water for clay or sandstone sharpeners., And use oil for oil based whetstones.
Begin by rotating the stone in a circular motion on the edge of the blade while slowly moving from end to end. You have to distribute an even amount of pressure during the entire process to avoid creating an uneven or irregular surface.
Do this on all sides of the blade, switching back and forth from time to time so that the blade is even. Be aware of buildup on the whetstone. You should wipe it down often to prevent the sharpener or blade from damage.
Honing the edge with a leather or similar strap
This step is optional, but if you wish to have an axe that is sharp, strong, and handsome, it’s highly recommended. Honing your blade using a leather strap will give your axe a keener, finer and more polished appearance after sharpening.
The blade will get a sharpened edge with an ultra-smooth look and no burrs remain on your axe. The result will be a blade with a sheen and sharp appearance.
Use a relaxed but sturdy grip on the axe to lightly stroke its blade against the leather. Your motions need to be going on the fine edge of the blade. Move the axe back and forth towards you, keeping the blade against the leather.
Endeavour to make progress with the bevel and shape of the axe so that you can evenly hone the edge. Flip the axe over and do the process on the other side. Move back and forth on the sharpened edge of the blade. Afterwards, you can add a protective coating on the blade.
Using A Sharpening Gauge
It is time to check the shape of the edge with a sharpening gauge. The gauge is simply made from a piece of cardboard, a small piece of brass, or even a piece of wood. It’s used to check for the sharpness of the blade.
The angle is about 25 degrees but is slightly convex. The gauge should be exactly to scale and can serve as a template. You use it to check the shape of the edge.
You are now finished with sharpening the blade, and it should be pristine condition. Particular attention has to be made to ensure you use the relevant tools and techniques for maximum safety and effectiveness. Check out our article on how to choose the best survival axe to ensure your protection outdoors.
Featured Image Source: https://www.flickr.com/photos/90907731@N00/3323589029