So, there I was, too stubborn to admit that I was in pain. Not forty steps from where I had tripped on an unseen root, I could feel my ankle starting to swell. I knelt down to tighten my laces while my companion made hushed clucking noises under her breath. I was twenty-one and previously unbreakable. I stumbled forward, gingerly placing my left foot on the ground and gritting my teeth. Limping more with each step.
Finally, I gave in and sat down on a rock. We had two hours of daylight left and three miles (3.2 km) to the car. That was the day I learned how to make a walking stick.
See also: How to Walk: A Guide To Making Sure Your Gait Brings You Strength
It wasn’t pretty. It was too big for my hand to hold comfortably, and it spewed sap on anyone and anything it came near. After thirty minutes, my palm was raw from the rough bark. In reality, it was just an old limb off a blown down fir I had hacked to a reasonable length with a pocket knife. But it worked. Barely.
With each step, I noticed a new deficiency and an improvement I could make. I took a lot of mental notes. And I made a promise. If I got back home, I was going to make a proper walking stick. Not just any stick, I was going to craft the finest staff the world had ever seen.
And that’s how my love affair with walking sticks began. Over the years, I have made quite a few. They gradually became better, more functional, more aesthetically pleasing. I don’t think I have produced the world’s best yet. I am not a great woodcarver. But if you follow this guide, this step-by-step tutorial on making a walking stick, you will end up with something you can keep forever and be proud of out on the trail.
Cane, Stick, or Staff?
The first thing you need to decide is what kind of stick you are making. Will it be short like a cane? Long like Gandalf’s staff? Maybe something in between? It is up to you. But decide now, before you begin. You can always make a stick shorter, but longer is pretty tough.
Close your eyes and form a mental picture of what you want to create. Be detailed. Think about the color of the wood, the ornate carving of the head, and whether you want a grip or a sling. The clearer you envision the finished product now before you start, the better it will be. Got it? Good.
For tips on how to use walking poles, check out our earlier article to find out more.
Hardwoods are Best
You can make a walking stick out of just about anything, but I recommend wood. Why? Because it is beautiful, durable, and appropriate for hiking. It is also affordable. Even free, if you can find what you are looking for in the forest. I have used many different species of wood, and I have learned one thing. Hardwoods are better than softwoods. Hardwoods (oak, maple, and walnut, to name a few) are denser than softwoods (pine and spruce).
This density makes hardwoods more durable and better suited for this purpose. Also, softwoods become gummy when you work with them, are harder to sand, and don’t take finishes as well. For these reasons, stick with hardwoods if possible.
Size Matters
Now that we have decided on the type of walking stick and the material, it is time to talk about size. A walking stick should be about 2 inches (5 cm) thick at the top and only slightly smaller at the bottom. This diameter gives you control of the stick without tiring your hand. The length is up to you, but I prefer a stick that comes up to my shoulder or slightly below. For me, this is about 60 inches (152 cm).
This gives me plenty of leverage when walking downhill without being too long and clumsy. This length is only my personal preference. Standard heights range from the armpit to the top of the head. If you have a different length in mind, go for it. The key is your comfort. Make sure you also have the best walking boots with excellent traction – read our article for reference.
Finding Wood
There are two schools of thought on sourcing wood. The first method is to find a downed branch. The wood is already dry, and you will be able to work with it right away. Be careful to ensure the wood is sound, with no evidence of rot or insect damage.
The other route is to use a fresh-cut limb or sapling. I am not advocating you go out into the forest and cut your own. If you don’t own a hardwood tree, there are several options to find wood if you look hard enough. I find most of my material while volunteering on trail rehabilitation projects, and I secured a beautiful section of oak when my neighbor trimmed his trees a few years ago.
Look for the straightest piece possible. Even a slight bend will make it less functional. Make sure there are no splits or cracks in the section you will be using, and try to avoid large knots.
Prepping the Wood
The next step is to remove the bark. This can be done in a variety of ways. The simplest is to use a drawknife, but a regular knife will work. Work carefully without gouging the wood. This process takes a while, but the finished result is worth it. Some species have an inner layer of bark. Remove this as well, or the piece will discolor, usually unevenly.
Once the bark is removed, get out your sandpaper. Starting with a heavy grit, like 120, smooth out the obvious rough spots. A random orbital or disk sander works great for this. If you do not have access to either of these tools, hand sanding will also work. When you can no longer see tool marks left from the knife, switch to a finer grit such as 180 or 220. Be patient. This is tedious work. Wipe the piece down with a damp cloth whenever the sandpaper fills with dust.
Continue this process until the wood is perfectly smooth. Occasionally run your finger over the surface to feel for ridges or depressions. Anything you can feel on the surface will show up when the piece is finished.
Put a Head On It
This next step is why we took the time to visualize the project before we started. If you are planning to include a carved head in your design, your selection of wood should have included extra material at the top.
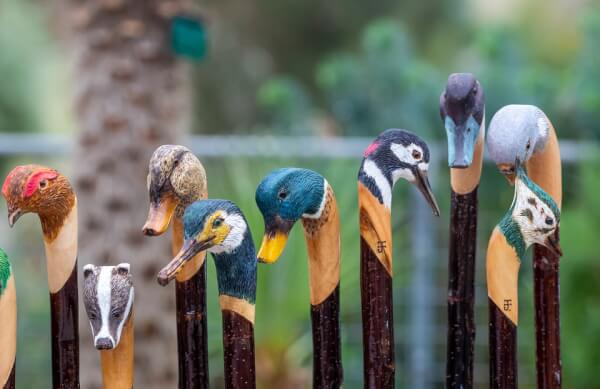
The easiest way to carve a head is to first draw the design on a piece of paper. I have seen some pretty elaborate designs. Bald Eagles. Grizzly Bears. Salmon. The sky is the limit. You are only bound by your creativity and skill as a woodcarver. Next, transfer the image to your material with a pencil.
Using a sharp knife, rough out the general shape of your figure. Switching to a smaller blade, carefully add the details. When you are finished with your masterpiece, carefully sand your work. Finish with 220 grit sandpaper.
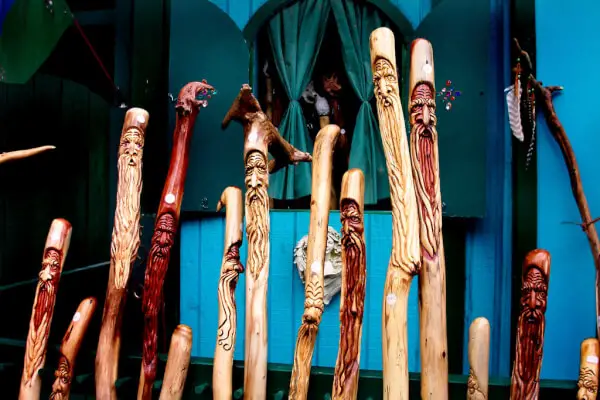
Heads do not have to be carved figures of animals. I have seen excellent staffs with inlays of polished rocks, crystals, and even other types of wood. A friend of mine has a small liquid compass embedded in the top of his walking stick, perfectly at eye level. I am not sure if it is accurate, but it sure looks impressive.
My uncle carved a notched head on his shoulder-height staff. This served as a rest for his favorite rifle. He swore he could take down a mule deer at 500 meters with this rig. I never witnessed him make the shot, but I did enjoy venison at his dinner table more than a few times.
Use the Entire Stick as Your Canvas
While the head is your centerpiece, the rest of the stick is a blank slate waiting for your personalization. I met a native Alaskan once with an elaborate carving encircling his entire staff. He told me it was the circle of men and bears and served to remind him of his unity with nature. It was beautiful.
Another acquaintance carves a pictograph symbolizing each hike the stick has completed. His hiking stick serves as a history of his outdoor adventures and is deeply meaningful to its owner.
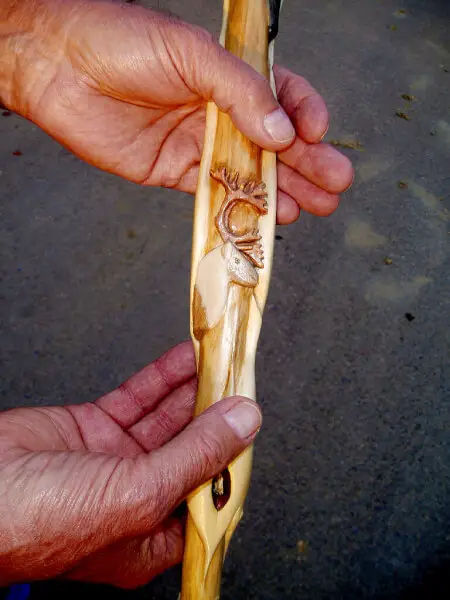
Decorating is not limited to carving. Wood burning tools are cheap and produce better results for many burgeoning artists. Map out a design on paper. Transfer it to the wood and burn away. It is that easy. I once came across a staff with hundreds of perfectly recreated animals. The owner told me he had used art stencils. A lot of work but very impressive.
On the more practical side, I have come across staffs marked in increments useful for measuring the depth of water and snow. One traveling companion burned his name and address on the side so it could be returned to him if ever lost.
Preventing Splits
At this point, you have a lot invested in the project. The next few steps are designed to protect that effort and prolong the life of your staff. With proper care and a little common sense walking sticks will last for years. Unless you are like my buddy Jason, seemingly lacking other options, Jason used his stick to suspend a dutch oven over an open fire to make stew one night. Stews take a while. About an hour in, the heat from the fire caused the stick to bend. Then it snapped. The stew was ruined, and so was the stick. It’s too bad. It was a promising stew, and I was hungry.
But we are more worried about protection against normal wear and tear, not friends of dubious intellect. It stands to reason that the foot will suffer some abuse. It is also the narrowest part, leaving it susceptible to splits. Fortunately, there are some easy steps to take to prevent this. All it requires is a quick trip to the hardware store.
The hardware store? Yep. You are looking for a piece of copper pipe. The kind used for water lines. They come in multiple sizes. Choose one that is slightly smaller than the foot of your stick and only an inch (2-3 cm) or so long. Better yet, if they carry the fitting used to end runs of copper pipe, called a cap, grab one of those. They are cheap.
Carefully whittle the end of your staff so that it barely squeezes into the fitting you chose. Don’t put it on yet. They are hard to take off, so we only want to do this once. Squeeze some waterproof wood glue or epoxy resin into the fitting. With a rubber mallet, force the fitting onto the end of the staff.
If using a pipe, make sure it is even with or slightly above the end of the stick. When using a cap, make sure the stick is bottomed out in the fitting. Carefully wipe off any adhesive which has squeezed out. Set the piece aside to dry.
Properly Finished
Once the glue has dried, it is time to finish the DIY walking stick. By finishing, I mean stain and varnish. Not actually finish the project. But the end is coming. Soon.
To stain or not to stain is up to you. Some woods look great with only a clear protectant coat. Others respond well to stains that complement their natural colors. To see what your stick will look like with only a clear coat, wet your finger and rub it on the wood. That is the color you will have. Stains come in a variety of colors. Do some research online to discover which stains go well with your species of wood.
Apply your stain according to the directions. Make sure you have an even coat and allow it to dry thoroughly. Apply additional coats to make the color darker or more consistent.
The next step is to apply a protective layer. You can use either varnish or polyurethane. I prefer marine varnish. It is the toughest and holds up well to ultraviolet rays. It is also more expensive and harder to apply. When using varnish, I apply multiple coats and thin with lacquer thinner. Make sure you are using a quality brush. We don’t want brush marks to show after all of your hard work.
Polyurethane is a good option. It is available in aerosol and liquid forms. You can get it in semi-gloss, gloss, and matte finishes. Lots of options. Choose one and apply as many coats as time and energy permit. Eventually, you will see the finish develop a depth and body. This is what makes your stick stand out from the crowd.
With use and exposure to the elements, the topcoat will eventually fail. Periodically I sand my hiking stick down lightly with fine sandpaper and apply a new coat of varnish/polyurethane. In a short amount of time, you can make it look brand new again.
Grips and Loops
When I use my hiking stick, I prefer a comfortable place to grip. I find this especially useful in the rain or snow. If you are interested in this addition, decide on your preferred material. I like leather, but I know plenty of people who use materials such as hemp and paracord.
Measure where your hand comfortably grasps the stick with it upright in front of you. Take about 6 inches (15cm) of line and glue it vertically along your stick. Tightly wrap the remaining cord from top to bottom, completely covering the glued-on strip, and tie it off at the bottom, where the line ends. Easy. And you have a small amount of cordage on hand in case of emergency.
I also prefer a loop added to the top of my stick. This makes the staff easy to hang when storing and prevents it from slipping totally out of my hand when fording streams or walking through deep snow. Adding a loop is easy.
Drill a hole through the top of the staff, close to the end but not too close. You don’t want to split the wood. Start with a small drill bit and gradually increase the bit size. Again, to prevent splitting. Take a length of the same material you used for your handle and pass it through the hole, tying it off to form a loop. I told you it was easy.
Sit Back and Enjoy
The last step is to lean the hiking stick against the wall and step back so you can take it all in. This wonderful piece of functional art that you created with your bare hands. You have made yourself a tool and a companion for the adventures to come. With proper care and routine maintenance, this stick might last you a lifetime. The best part is it is personal to you. It is hard to buy something like that.
This project might be more in-depth than you anticipated. That is okay. There are several ways to make a serviceable stick in the interim. Broom handles work in a pinch. You can add a grip or a loop or just use the stick. Stout dowel rods are another alternative. They lack the organic look of a natural wood staff, but they will serve you well. Try one of these fast and easy alternatives to see if you like using a hiking stick. If you do, tackle the project outlined above.
For more tips and guidelines on how to make your own walking poles, see our article on this to find out.
Featured Image Source: https://pixabay.com/de/photos/stiefel-wandern-schuhe-leder-1001683/


