Getting into backpacking doesn’t require a trust fund or a second mortgage. I’ve seen too many people drop $800+ on their first setup, only to realize six months later they hate sleeping on the ground. Or worse — they bought gear that doesn’t actually work for how they hike.
Here’s the thing: my first overnight trip cost me about $180 total. I used a borrowed sleeping pad, a tarp from Amazon, and a pack I found at Goodwill for twelve bucks. Was it pretty? No. Did I look like the ultralight hikers on Instagram? Definitely not. But I slept dry, woke up sore in a good way, and came home knowing this was something I wanted to keep doing.
That’s what this guide is about — getting you on trail without the financial hangover. We’ll cover exactly what you need, what you can skip, and where to find gear that won’t disintegrate after one wet night.
What You Actually Need for Your First Backpacking Trip
Forget the 47-item checklists you’ve seen online. Most of that stuff is either optional or can be improvised. Your first trip isn’t an expedition — it’s a test run. You’re figuring out if you even like this hobby before going all-in.
The Big Three (Pack, Shelter, Sleep System)
These three categories eat up 70-80% of your budget and pack weight. Get them wrong, and you’ll be miserable. Get them right, and everything else is just details.
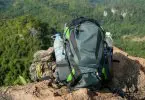
Your pack needs to fit your torso, carry 25-35 pounds without destroying your shoulders, and have a hip belt that actually transfers weight. That’s it. You don’t need a carbon fiber frame or magnetic buckles. You need something that doesn’t hurt after mile three.
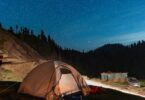
Shelter keeps you dry and blocks wind. Could be a tent. Could be a tarp. Could be a hammock with a rain fly if you’re in tree country. The point is having something between you and weather at 2 AM.
Sleep system means a sleeping bag (or quilt) plus a sleeping pad. The pad matters more than people think — it’s not just comfort, it’s insulation. Ground will suck heat out of you faster than cold air ever could. I learned this the hard way in the Catskills one April night with just a foam yoga mat. Never again.
What You Can Skip as a Beginner
Here’s where I’m gonna save you some money and pack weight:
- Trekking poles — Nice to have, not essential for flat or moderate trails. Borrow some first or grab a $15 pair if you really want them.
- Dedicated cookware — More on this later, but you already own stuff that works.
- GPS devices — Your phone with offline maps (Gaia, AllTrails, even Google Maps downloaded) handles 95% of trails. Bring a portable battery.
- Camp shoes — I hiked my first two years wearing my trail runners around camp. Your feet survive.
- Bear canisters — Only required in specific areas. Check regulations for your trail. An Ursack or even a bear hang works most places.
- Fancy water filtration — A $20 Sawyer Squeeze beats most options. You don’t need a gravity system yet.
Don’t buy gear to solve problems you haven’t had. Buy gear to get out there, then figure out what you actually need.
The Under-$200 Gear Strategy
Let’s break down how to outfit yourself without breaking triple digits on any single item. This isn’t about buying garbage — it’s about being strategic.
Budget Pack Options Under $60
The backpack is where beginners overspend most often. You don’t need a $300 Osprey for your first trip. You need something functional.
| Pack | Price | Capacity | Weight | Notes |
|---|---|---|---|---|
| Teton Sports Scout 3400 | ~$55 | 55L | 4.5 lbs | Workhorse. Heavy but comfortable. |
| Kelty Coyote 60 (used) | $40-70 | 60L | 4.2 lbs | Often on FB Marketplace |
| Amazon Basics Internal Frame | ~$50 | 55L | 4 lbs | Surprisingly decent |
| Osprey/Gregory (used) | $50-80 | Varies | Varies | Check REI Garage Sales |
My honest take? The Teton Sports Scout is hard to beat for pure value. It’s not ultralight — nothing at this price is — but it carries weight well and the build quality is solid. I’ve lent mine to three different first-timers and it’s still kicking.
If you can find a used Osprey or Gregory at a garage sale or REI Garage Sale event, jump on it. Those packs are built to last decades. Someone selling a perfectly good Exos for $60 because they upgraded? That’s your win.
Shelter Solutions Under $50 (Tarps, Budget Tents)
This is where budget backpacking gets creative. You’ve got options:
The tarp route ($15-35): A simple 8×10 silnylon or polyester tarp from Amazon or AliExpress gets the job done. Combine with trekking poles (or sticks you find) and some guylines. Takes practice to pitch, but weighs almost nothing and packs tiny. I still use a tarp on summer trips when bugs aren’t apocalyptic.
Budget tent route ($40-70):
The Naturehike Cloud Up 1 or 2 (depending on how much space you need) runs around $70-100 depending on sales. But if you catch it on AliExpress directly or during an Amazon lightning deal, you can snag it closer to $50. It’s legitimately good. Double-wall, freestanding, around 3 lbs. I was skeptical until I spent three nights in one during a rainy stretch in Shenandoah. Dry as a bone.
Walmart’s Ozark Trail 1-person backpacking tent goes for about $30-40. It’s heavier (closer to 4 lbs) and less durable, but it works. For a first trip or two, it’ll hold up fine.
Hammock option ($35-50): If you’re in an area with trees, a basic hammock setup can be cheaper than tent camping. A Wise Owl or similar hammock plus suspension runs about $35. Add a cheap tarp ($20) for rain protection. No sleeping pad needed if you get an underquilt, but those cost more — for warm weather, the hammock alone works.
Sleep System Hacks Under $40
This is where you really need to be smart, because a bad sleep system means a bad trip.
Sleeping pad: The Klymit Static V regularly goes on sale for $30-35. Inflatable, R-value around 1.3, weighs about a pound. Not warm enough for cold weather, but perfect for three-season trips. The basic foam pads (like the Nemo Switchback clone from Amazon) run $20-25 and work as backup or primary in warmer months. R-value around 2, indestructible.
Sleeping bag: Here’s where most budget guides fail you. They recommend $30 sleeping bags rated to 40°F and wonder why people freeze.
The trick is to buy used. A good 20°F synthetic bag from REI or Kelty, lightly used, goes for $30-50 on r/GearTrade or Facebook Marketplace. People upgrade to down and sell their synthetics for nothing.
If you must buy new, the Kelty Cosmic 20 synthetic runs about $60-70 on sale. Yes, that’s over budget for this category alone, but it’s a bag that’ll last five years and not leave you shivering at 35°F.
Budget hack: A $20 fleece liner from Sea to Summit or a knockoff adds 10-15°F to any bag. Pair a cheap 40°F bag with a liner for three-season use.
Filling the Gaps with Kitchen Gear You Already Own
Stop. Before you buy a titanium cook kit, check your kitchen drawers.
- That dented pot from your camping-as-a-kid days? Works perfectly.
- A metal water bottle with a wide mouth (like a Klean Kanteen) can boil water directly over a fire or stove.
- Plastic takeout containers make fine food storage.
- A regular metal spoon beats a spork. Fight me.
For stove options, a BRS-3000T clone from Amazon costs $10-15 and weighs an ounce. Pairs with a $4 fuel canister from Walmart. Total cook system: under $20.
Or go stoveless for your first trip. Overnight trips don’t require hot meals. Cold-soak your oatmeal in a peanut butter jar (yeah, those work for backpacking). Bring bars, tortillas with peanut butter, summer sausage. I’ve done week-long trips without a stove when I didn’t feel like carrying the weight.
Where to Find Cheap Backpacking Gear
Knowing where to shop matters more than knowing what to buy. The same pack can cost $200 or $60 depending on where you look.
Thrift Stores, Garage Sales, and Gear Swaps
Goodwill and Salvation Army in outdoorsy towns are goldmines. I found a $400 Gregory pack for $18 in Asheville. Still my main pack.
Estate sales — especially from older folks who were into hiking — sometimes have vintage gear that’s bombproof. REI Garage Sales happen quarterly at most locations. Show up early. Bring coffee. The lines are worth it.
Local gear swap events run by hiking clubs or outdoor stores happen more often than you’d think. Facebook groups like “[Your City] Hiking and Backpacking” often coordinate them.
Amazon Basics and Walmart Alternatives
Amazon Basics isn’t exciting, but the quality-to-price ratio is often solid. Their trekking poles ($25) match poles costing three times as much. Their dry bags, compression sacks, and camp towels are all fine.
Walmart’s Ozark Trail line ranges from “garbage” to “surprisingly decent” depending on the specific product. The backpacks are mediocre. The basic camping accessories (stakes, cord, flashlights) are fine. Their cooler knocked off Yeti well enough that Yeti sued them.
Decathlon (if you have one nearby or order online) makes genuinely good gear at weird-low prices. Their Forclaz line has sleeping bags and tents that punch way above their cost. European company, quality focus, but budget friendly.
r/ULgeartrade and Facebook Marketplace
Reddit’s r/ULgeartrade and r/GearTrade are where ultralight hikers sell their “old” gear after upgrading. One person’s discarded 35oz pack is a perfectly good pack that’s lighter than anything at Walmart.
Filter by “[WTS]” posts and sort by new. Good deals go fast. Shipping’s usually reasonable. I’ve bought a dozen items off these subs and only been burned once (and PayPal refunded me).
Facebook Marketplace lets you search locally and skip shipping. Search for:
- “backpacking”
- “hiking gear”
- “camping” (you’ll wade through car camping stuff, but deals hide there)
- Specific brand names: “Osprey,” “Gregory,” “Kelty,” “REI”
Negotiate. Most people just want stuff gone.
Sample $200 Gear List with Exact Products
Alright, let’s put it all together. Here’s a real list I put together for a friend last summer:
| Item | Source | Price |
|---|---|---|
| Teton Sports Scout 3400 Pack | Amazon | $55 |
| Ozark Trail 1-Person Tent | Walmart | $35 |
| Klymit Static V Sleeping Pad | Amazon (sale) | $32 |
| Kelty Tuck 40°F Sleeping Bag | REI Garage Sale | $28 |
| Fleece Sleeping Bag Liner | Amazon | $18 |
| BRS-3000T Stove | Amazon | $12 |
| Fuel Canister | Walmart | $5 |
| Sawyer Squeeze Filter | Amazon | $22 |
| Total | $207 |
Came in at $207. She used her own pot from home, borrowed trekking poles from me, and picked up a $3 headlamp from a Dollar General that still works two years later.
Could we go cheaper? Absolutely. Swap the tent for a tarp ($20 saved). Find the sleeping bag used on Facebook ($10 saved). Skip the stove entirely and eat cold food ($17 saved). You’re suddenly at $160.
Could we go heavier? Sure. But this setup totals around 14-15 lbs base weight, which isn’t bad. You’re not winning any ultralight awards, but you won’t be suffering either.
Planning Your First Budget Trip (Trail Selection Tips)
Gear’s only half the equation. Picking the right first trail keeps you from hating this hobby before you’ve really tried it.
Go short. Your first overnight should be 3-8 miles to camp, not a 15-mile death march. You’re testing gear, testing yourself, testing the whole concept. Keep it manageable.
Pick established trails. State parks with designated backcountry sites are perfect. Trail’s maintained, water sources are marked, you’re not truly in the middle of nowhere. If something goes wrong, you’re a few miles from a parking lot, not three days from civilization.
Check water availability. Nothing ruins a budget trip faster than realizing you need to carry 6 liters of water because there’s no source for 12 miles. Seasonal creeks dry up. Springs get reported on AllTrails comments. Do your homework.
Avoid permit hassles for trip one. Popular wilderness areas (like anything in the Sierras) require permits, reservations, and planning. Your first trip should be: pick a weekend, drive to trailhead, hike in, camp, hike out. Keep it simple.
Good starter options depending on region:
- East Coast: Shenandoah has tons of access, water everywhere, well-maintained camps
- Southeast: Pisgah, Chattahoochee, or Big South Fork
- Midwest: Manistee River Trail, Porcupine Mountains
- West: Not Yosemite or Rainier for your first trip. Try Angeles National Forest, Gifford Pinchot, or less famous BLM land.
Common Budget Mistakes That Cost More Long-Term
Being cheap isn’t the same as being smart. Some “savings” cost you more eventually.
Buying the $15 sleeping pad that doesn’t insulate. You’ll freeze, hate it, and buy a real pad anyway. That’s $15 wasted. Spend $30-35 once.
Skimping on rain protection. A $10 poncho rips the first time you snag a branch. A $30 Frogg Toggs jacket lasts seasons. Or bring a trash bag — genuinely — as an emergency backup. But don’t gamble on cheap rain gear being functional.
Getting the 65L pack “for future trips”. Bigger packs encourage you to bring more stuff. You fill the space available. A 50-55L pack forces discipline. You can always lash things to the outside if needed.
Ignoring footwear. Here’s where I actually recommend spending more. Your feet carry everything. Trail runners that fit well ($60-100) beat cheap hiking boots that give you blisters. Most thru-hikers wear trail runners now. Get fitted at REI if possible — they don’t care if you buy elsewhere.
Buying complete “backpacking kits”. Those Amazon bundles with tent + bag + pad + mat for $79? They’re heavy, poorly made, and you’ll replace every piece within a year. Buy items individually so you can upgrade piece by piece.
Frequently Asked Questions
Is $200 really enough to start backpacking?
Yes, but it requires buying strategically. You won’t have ultralight gear or name-brand everything. You’ll have functional equipment that gets you on trail. I’d rather see someone spend $200 and do ten trips than spend $800 and do one trip before deciding backpacking isn’t for them.
What’s the single most important piece of gear to invest in?
Sleep system. A cold, uncomfortable night will make you hate everything by morning. Make sure your sleeping bag is warm enough for the temperatures you’ll face and your pad actually insulates. Everything else — pack, tent, stove — can be mediocre and you’ll survive. Bad sleep wrecks the whole experience.
Can I use regular camping gear for backpacking?
Some of it. The problem is weight and packed size. Car camping tents weigh 8-15 pounds. Car camping sleeping bags are massive. That works when you’re walking 50 feet from your car. It’s brutal after mile five. Look for items that pack down small and aim for base weight (everything except food, water, worn clothes) under 20 pounds to start. Under 15 is better.
Should I borrow gear instead of buying for my first trip?
If you can, absolutely. Ask friends who backpack. Check if REI or local outdoor shops rent gear. Some hiking clubs have gear libraries. Using borrowed equipment on trip one helps you understand what you actually need before spending money. Just don’t borrow boots — footwear needs to fit you.
How do I know if cheap gear is “too cheap”?
Read reviews specifically mentioning durability and actual trail use. Amazon reviews that say “looks great, just arrived!” tell you nothing. Look for “used this for 50 miles” or “held up through three nights of rain.” Reddit threads on r/CampingGear and r/Ultralight discuss budget options extensively. If multiple people say something fell apart, believe them.
Getting started doesn’t require getting into debt. The trails don’t care what brand your pack is. They don’t check whether your tent costs $50 or $500. What matters is getting out there — figuring out if this is something you want in your life.
Start cheap. Learn what you actually need. Upgrade piece by piece as old gear wears out or your preferences become clear. I’m still using that Goodwill pack for some trips. It’s not pretty, but it carries my stuff and reminds me that the best gear is whatever gets you outside.
Now stop reading and start planning your first trip. The gear will work. You’ll figure out the rest on trail.
Featured Image Source: Pexels