An appropriate camping boots for outdoor activities are essential to have a comfortable and peaceful time. As an obvious fact, trailing in the wild needs proper attention in almost everything included in your gear. The best outdoor activity preferred by travelers is traveling by foot and thus the footwear is of major importance.
The best pair of boots apart from smart buying, also needs care and attention to withstand all the unfavorable conditions of the wild. But what if those little tires of your trip are just exhausted and are subjected to wear and tear?
See also: How to Repair Leather Hiking Boots: Make Your Favorite Boots Last Longer
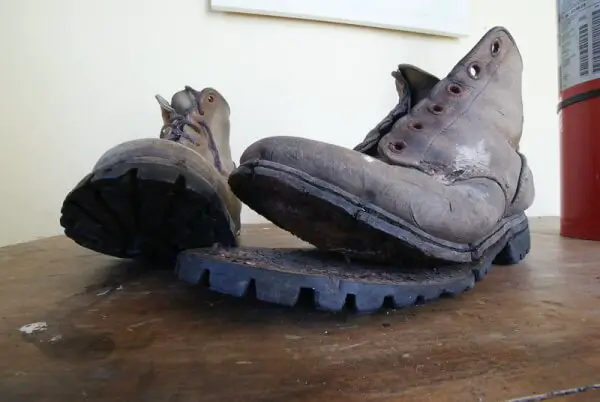
Since your boots are under constant wear and tear, one of the more major signs that you should pay attention to is sole separation. So in this case, would you go out and buy a fresh pair just because yours have sole separation? If you can afford it, then why not?
However, many of us are not exactly millionaires and hiking boots are not necessarily cheap. Thus, it won’t hurt if you know the skills of proper boot sole repair. Lucky for you, this article will teach you all the basic techniques of sole repair.
Being able to repair your sole, at least temporarily is an important skill if you’re an outdoorsman. What if your pair goes through sole separation while in the wild? Also, depending upon the nature of the wear and tear of the boots, the possible fixing solutions might vary.
The proper repair techniques will not only keep your pair of boots working again but it can help with making them last longer.
Think Before Purchasing
A wise person is one who prepares well for any sort of activity he or she is going to perform in the future. For an outdoor trip, all the necessities are to be taken care of wisely especially if you are intending to spend more than a day in the wild. While purchasing the traveling boots for your trip, try to choose one which best suits the trail conditions.
A huge variety of boots is available in the market and each having their own unique features and form factor. Some are made for the ice terrains, others for forests, deserts, rocky mountains and many more. When exploring the wild, make sure that you use the pair of boots that can handle everything that the trail throws at it.
Since most of the travelers, hikers and campers are not confined to a single area of travel, they prefer choosing multi-purpose traveling boots. They are however a bit expensive comparatively but are very durable and comfortable. To help you how to choose between hiking boots and hiking shoes, read our previous article to find out.
What are the best traveling boots for outdoor activities? Let this question be answered some other time and right now we will focus on the repairing or fixing your trusty boots.
Primary Fixing Technique
The usage of adhesives or glue is the most common way for fixing most types of footwear especially in the initial state of wear and tear aka when the sole gets a little or partially separated from the rest of the boot.
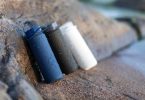
A lot of ready-made adhesives are easily available in the superstores like Boot-fix Shoe Glue, Gear Aid Freesole Urethane and Shoe Goo etc. with an affordable price range of $6-$7. You better include one or two glue tubes in your gear for emergency purposes.
Don’t forget to identify the material of your boots and then choose the accordingly made adhesive for it.
Material
The boots used in the outdoor activities are generally made up of either rubber, vinyl, leather or other related materials. The following well-known repairing glues are listed along with their appropriate suitability with the material:Material Glue Product Leather/Rubber Barge Glue Cement Rubber Rubber/Vinyl Boot-fix Shoe Glue All Shoe Goo All Gear Aid Freesole Urethane Shoe Repair
Methodology of Repair
Now so that you are aware of commonly used adhesives for boot repair, it is now the time to explain you the steps on how to practically accomplish it. If you are using an adhesive for fixing the boot, follow the steps below:
Step 1: Clean out all the dirt, soil or any other materials stuck to the shoe, especially to the areas where the adhesives are to be applied. Clean it with a piece of wet cloth or dipped in spirit or alcohol. Once the surface is entirely cleaned, let it dry for some time.
Step 2: Open up both the surfaces to the possible extreme positions (too much opening might cause the wear to increase further). Don’t forget to keep yourself safe from the materials like spirit and glue used for the purpose. If available, use any gloves or anything you can use to cover your hands, eyes and face.
Step 3: Apply the glue/adhesive to both the surfaces gently on the corner ends of the separation.
Step 4: Leave it for few seconds and then rejoin both the surfaces accurately.
Step 5: Hold it for few minutes by applying a uniform pressure on the entire glued area. Once they are stuck together well, let it dry for about few hours and you are done.
Sealants are sometimes also used to avoid the entrance of water or other elements which might fade away the adhering property of the glue and may result in damage again after a short interval period.
Additional Considerations
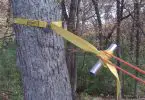
Applying pressure is sometimes problematic for people and they use other techniques for achieving their goal. For example, some are using rubber bands, tape or a clamp across the repaired area to keep it firm and pressed, until it is properly fixed.
Tapping it with a heavy material is also applicable but it is not recommended often because of the risk of damaging your pair of boots. The adhesives are generally made up of organic materials and therefore temperature sensitive. For drying purposes, the repaired boots are kept in the sun for few hours.
But most of the time when you are away from the sun rays or it is a night time, a camping fire is considered as the best choice. However, you will want to use extreme caution when drying your boots in open fire. It is because the excessive heat may cause the applied glue to melt which is the opposite of what you’re trying to achieve.
Some experts swear by the technique of having the repaired boots in the cold so that the glue may freeze and stick together well, adhering both the surfaces together.
Of course, if you are in the wild, you will not have access to adhesives or any materials for that matter. However, who’s stopping you from bringing your own adhesives to the trip? True enough, you should make it a point that you have the right adhesive agents as part of your outdoor kit.
When you’re out in the wild, it’s better to perform a stop gap solution to a mangled boots rather than being stuck with wearing a damaged pair. So bring a boot repair adhesive, seriously!
Fixing your boots in the wild
You are definitely a hiker, traveler or adventurer and not a shoemaker right? If you are a shoemaker and a traveler then no problem! Repairing boots in the wilderness might be a non-issue for you. But alas! You are not that one… So what? You don’t need to learn rocket science just to be able to repair your hiking footwear.
We are going to help you learn the technique for repairing your boot sole when you don’t have any kind of glue or adhesive available.
Generally, most of the hikers and travelers keep the emergency items in their gear which can be used for different purposes. For example, a thread and needle purely intended for fixing the damaged part of the tent or bag pack. But they can also be used for opening the tiny frozen hole of the gas cylinder and the blocked holes of the camping stove.
In the similar context, if you are having few nails in your gear, they are going to help you fix the boot with a sole separation. But do remember that this is a last resort in case you have no access to any adhesives or glue to keep the separated sole attached.
However, this doesn’t mean that you can just use any nail. If you have a smaller nail, then we are in business. Here are the steps on how to repair a boot using a nail:
Step 1: Stuff a piece of hard material like stone or wood in the boot and turn the lateral portion to the top keeping it firm and stable.
Step 2: Hammer a couple of nails onto the edges of the damaged portion. (Take a rough calculation of how deep the nails will go. If they are somewhat remaining in the middle it is fine but if exceeding a little, use a piece of paper or cardboard to decrease the penetrating area)
Step 3: Don’t hammer it much as it is just a temporary fix.
Step 4: Once it is fixed, keep the stuff out of the interior and check with your hand if the nails are not going to bother your feet. If it is not, you are done.
Again, this is a last resort which should only be used if you are left with little to no options. When doing this “fix”, your pair is as good as done and will need to be replaced. This is so you can get through the rest of your trip with your boots.
Secondary Options
Repairing the sole of your boots may seem like a simple matter but it can be time consuming. If there is no other option, then you will definitely have to spare time for it. It’s a good thing there are numerous solutions to repairing a separate sole. Some of the tips and tricks that you should keep in mind in case you run in this sort of footwear dilemma:
- For long term outdoor activities, it is better to keep an extra pair of traveling boots in your gear. In the case of emergency, the quickest option will be using that extra pair of boots. Once you are back to your camp, you may fix the ones got damaged.
- Keep all the necessary items needed for fixing your shoes like adhesives, shoe laces, soles and heels etc. It is because sometimes the sole is totally irreparable and you will need to replace it rather than attempting to fix it. If you will have the availability, the replacement isn’t a difficult job. Check out our top pick for the best hiking boot laces to give you options.
- Try to look at your track and trail. If your shoes are capable of withstanding the trail, use it. Otherwise avoid it as it may cause the damage to your feet, ankles or be the cause of ergonomic diseases. Use the appropriate boots made for the specified trails and areas. This is not just about the durability and longevity of your boots but for your own comfort as well.
Wrapping Up…
At this point, you should be well on your way to repair a boot sole separation on your own. There are certainly many different ways to handle this sort of footwear dilemma. However, using the right techniques at the right situation is one of the most important things.
It’s also important to recognize if your pair of boots is still repairable or is beyond hope. If your boots are looking like it’s going to give up soon, have the sense to not use them for your future trips. Boots don’t last forever and at some point, you will have to replace them.
However, this sure doesn’t mean that you should not take proper care and maintenance of your trusty pair. Love and care for your boots and it will love you back by serving you a long time.
Before you head out on your next trip, check out our article review of the top winter hiking boots to give you more options.
Featured Image Source: https://www.flickr.com/photos/88123769@N02/8115483287