You’ve seen famous bushcraft experts like Ray Mears rock up to a spot in the jungle and throw up a tarp shelter in just a few minutes. But if you’ve never tried tarp camping for yourself, you should.
Tarps are a great way to learn about weather and wind direction, and they are something that everyone who’s serious about the outdoors should be familiar with. Often overlooked for fancier gear, the good old-fashioned tarp still has plenty to offer today.
Tarp Vs. Tent
The obvious advantage of a tarp over a tent is the tarp’s compact size and relatively low weight. Its simplicity allows for a very quick set up and pack down time, especially when you’ve had a bit of practice. There are also many ways that you can pitch a tarp shelter, meaning that you can come up with a perfect solution for your site, needs, group size and weather conditions.
You can light a fire under a tarp for cooking and when properly set up a tarp can reflect the heat from a fire, keeping the occupants warm.
The price of a low-end one or two man trekking tent will be at least double the cost of a high-end tarp. If you break a tent pole or need a repair to your tent, you will face a bill that is much higher than the cost of repairing your torn tarp. And if a tent is broken or torn while out on an expedition, the solution won’t be as simple as just using another tarp configuration.
See also: Tent Footprint vs Tarp: Which Groundsheet is Best for Protecting Your Tent?
A tarp will make a useful addition to your outdoor gear even if you already have a tent that you enjoy using. It can be used to provide an extra area of cover for more dry living space, as a windbreak, or as a place to stash gear out of the weather. In an emergency the humble tarp can also be used to carry a casualty, or as a very quick emergency shelter.
There are, of course, a few downsides to the tarp. For starters, there is nothing other than your campfire smoke to stop critters getting to you under an open tarp. If bugs are not your thing, maybe a tent would suit you better. And while tarps don’t require poles they will need trees so if you are going above the tree-line, again, a tent might be a better option.
Finally, tarps need a little bit of know-how, and it is not recommended that you go out with a tarp as your only shelter without practicing close to home first. However, if you are prepared to put in the effort to learn, the rewards are worth it.
Ray Mears on Tarps
The great man of bushcraft himself, Ray Mears, has this to say on the subject of tarps –
‘…under a tarp you sleep closer to nature and wake up to limitless fresh air.’
‘The tarp-and-hammock is my favourite way bar none of sleeping outdoors. I use this bivouac in the warm months of the year in temperate climates and most of the time in the tropics.’
‘The whole operation takes only five minutes, and when you break camp in the morning there is hardly a trace that you were ever there, which is the perfect way of camping in forests.’
(Ray Mears Essential Bushcraft, Ray Mears)
Cody Lundin on Tarps
‘In short, the tarp is a miracle membrane that repels wind, snow, rain and excess sun – virtually any weather condition that Mother Nature can throw at you – and it does so in a lightweight, portable fashion, cheaply, effectively, and with a minimal amount of effort from the user.’
(When All Hell Breaks Loose: Stuff You Need to Survive When Disaster Strikes, Cody Lundin)
Choosing the Right Tarp For You
Tarps come in a wide range of different sizes, materials, and weights. There are some very cheap options and some more expensive types. Which one you choose will depend on how much you are going to use it, how far you will need to carry it and what kind of conditions you expect to use it in.
The very cheapest option to play around with would be one of the cheap contractor’s tarpaulins available from DIY stores. These are usually made of heavy-duty polyethylene. They are very tough but can be difficult to work with as they tend to be bulky.
A more expensive tarp option (but one of the best) is a lightweight, purpose made camping tarp. Typically made out of tough, thin polyester with a waterproof coating, these have many secure fixing points and are very versatile. They pack down very small and are relatively easy to handle.
In between these two options is the traditional canvas tarp. These are tough and repairable, but will also be quite bulky and heavy when compared with a modern polyester type. Canvas will also need to be dried very carefully to prevent mildew. The heavier fabric will also need a very taut ridgeline to keep the shelter from sagging.
All types will need to be cleaned off (wiped or hosed down) and thoroughly dried before being stored. It is recommended that you don’t always fold the sheet along the same lines, to avoid excess wear on any one area.
The table below compares some aspects of a cheap vs. an expensive 9 ft square tarp.
| Cheap Contractors’ Tarpaulin | High-End Camping Tarp | |
| Approximate Price | $20 | $90 |
| Weight | 3.6 lbs | 1.75 lbs |
| Fixing Points | 4 | 19 |
Once you have decided on the type of tarp you are going to buy you will need to choose a size. You can choose between a square or rectangular sheet and both will come in a range of sizes.
Common sizes are 9ft square, which is big enough for one person and gear, and 12 ft x 15 ft, which works well as a group shelter.
A square shape is a little bit easier to set up when you are learning, and you can always add two sheets together to make a bigger shelter if needed in the future.
Also check out our guideline on hiking safety to prepare yourself for any eventuality.
Useful Extras
At the very least you are going to need some strong cord for ridgelines and guylines. Paracord is recommended, and you can set up quicker by having it attached to the main fixing points (corners and centers) on your sheet.
Poles, if needed at all, can be made improvised from trekking poles or made from sticks.
Some people like to use bungee cords, specially made line tensioners and clips with tarp shelters, but these are not essential and will add to the cost and pack weight of your shelter.
Essential Knots
At the very least you’ll need to learn these three knots to put up a decent tarp shelter.
The Evenk knot (or Siberian Hitch)
This is an excellent knot for tying in cold weather, as it can be easily tied and undone with gloves still on. The knot can be released quickly by pulling the working end of the line. Ray Mears made this knot famous when he used it in his popular television shows. It is useful for tying the first end of a ridgeline.
- Take the working end up over your hand and around the tree, then back down over your hand
- Loop the working end up behind your fingers and back down over your fingers again
- Form a loop with the working end and grasp firmly between the fingers
- Pull the loop through the line twisted around your hand
- Pull tight
The Taut-Line Hitch
This knot is an adjustable one for use on lines that will need to be periodically tightened. A rolling hitch is tied around the standing part of the ridgeline.
- Make a turn around the tree leaving a few feet free.
- Working back towards the tree, wrap the working end around the standing line twice.
- Wrap the working end around the standing line again – this time on the side away from the tree
- Pull tight
The Slippery Adjustable Loop
This knot is excellent for tying around pegs or tree stumps to tie out guylines, It is another quick release knot which will make packing down very quick.
- Start off with a Figure Eight knot at the end of your guyline. Leave enough line at the working end to make a loop for your peg.
- Your Figure Eight should stay loose while you form a loop with the working end and bring it back to the top of the Eight.
- Take the working end around the back of the standing line.
- Feed the working end through the Eight on the far side of the standing line – through the top loop from back to front, then through the bottom loop from front to back
- Pull tight
Tarp Tent Set Up
When looking for a place to get your tarp tent setup, an area of level ground is the priority. Make sure there are a couple of well-spaced trees for attaching ridgelines. Take a note of the wind direction so that you can pitch your tarp for maximum protection from the elements. Check the area for hazards like hanging deadwood, chances of flooding, etc.
5 Tarp Shelter Configurations You Should Know
Sun Shade
This is perhaps the most simple tarp shelter configuration. Using a guyline on each of the four corners of your sheet. Pull the sheet taut as you attach each corner to a separate tree trunk, suspending the tarp flat above the ground to offer protection from the sun.
Additional guy lines can be used along the edges and may be needed on a larger tarp.
You can choose whatever height you like for this shelter, but it is nice to be able to walk underneath freely. This is a great set up for a group to use on a sunny day as a communal space. For tips on how to make your own tarp tent, see our article for more information.
A-Frame
Another very simple configuration, the A-frame will keep you and your gear sheltered from the rain and the sun. As there won’t be much headroom inside, this set up is best for sleeping in.
Tie a ridgeline between two trees at about chest height (lower in really bad weather, or to keep out of sight). Throw your tarp over the ridgeline and peg out the four corners equally. Try to position this shelter so that the open ends are away from the wind. You can also place one end near to natural shelter (brush, tree trunk, etc.) and move to the end furthest from the weather.
In really bad weather you can use two-thirds of the tarp for the roof parts of the shelter and fold the remainder underneath to use as a ground sheet. Position the shelter so that the edge where the tarp folds in to become a groundsheet is into the wind. You can use an extra line to keep this edge in shape if necessary. Now you’ve made a ‘body bag’ configuration.
Lean-To
The Lean-To is another very simple pitch. It is ideal for cooking as there is one open side for ventilation and the tarp will reflect the heat from the fire back to you.
First set up a ridgeline and attach one edge of your tarp to it. Chest height will be adequate. With a camping tarp, you should have attachment loops all along the edge that you can thread your ridgeline through. An ordinary contractors tarp you will need to attach lines to the corners and stretch these out to nearby trees.
Now, simply slope the rest of the tarp back and peg it out. If there is any wind you’ll want your back to the wind.
You can now set up your bedroll along the length of the lean-to and build your fire on the far side.
Diamond
This is an excellent pitch for cooking in windy or rainy conditions. To set up, choose your tree and tie one corner of your tarp to the trunk (about head height), keeping your back to the wind. Walking backward into the wind unfurl the tarp and peg the opposite diagonal corner tight to the ground.
Now that your tarp is captive and can’t be blown away by the wind, you can take your time pegging out the other two corners to the ground on either side.
This configuration gives plenty of back, side and top protection from the weather. It is also open enough to allow cooking and will reflect back some of the heat from the fire.
In really bad weather you can tie the shelter a little lower on the tree. You will have less headroom but more protection.
Again, don’t forget to practice before you need this shelter for real. Once you are cold and wet, things can seem a lot more difficult.
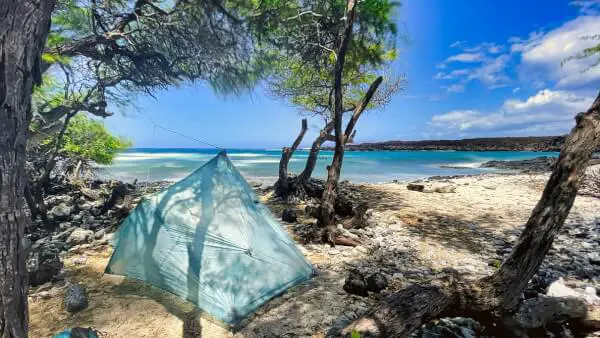
Pyramid
This is a fully enclosed shelter and will keep the weather out brilliantly. It has no groundsheet and will require a center pole or a ridgeline passing through the center loop of the tarp. This is best using a square-shaped sheet.
To start, spread out your square tarp on the ground. Peg the two back corners down tight. Next, bring the two front corners together at the center front, forming a triangle-shaped footprint and peg these down tight too.
You will now need to walk through the ‘doorway’ you have formed at the center front and push a ridgepole upright in the center of the triangular footprint to prop up the pyramid. You can use a trekking pole, a made for purpose pole or a stick for this. To prevent a pole tearing through the tarp you can place a rounded object over the pole end. A cup works well.
Using Your Tarp In Emergencies
In an emergency situation, a tarp can be very useful, used as either an improvised bothy bag or a stretcher.
To use as an improvised bothy for a group of people:
- Take off backpacks etc.
- All stand evenly spaced around the edge of the tarp with two hands holding the tarp edge
- All lift the tarp above heads at arm’s length
- All take a step forward then lower the tarp down behind your backs as you lean forward
- Finally, all sit on the ground with the tarp tucked underneath you
- Packs can be used as seats to provide further insulation from the cold ground. This form of emergency shelter is good for getting out of bad weather – the body heat of the occupants will warm the air inside very quickly. It can also be used to shelter a casualty and first aider who are in an exposed situation.
Practicing this kind of shelter in a non-emergency situation is advisable.
It is worth noting that a made for purpose emergency bothy will be high-visibility and will have ventilation and even ‘windows’ of clear vinyl built in. In a pinch, though, a tarp makes an adequate stand in.
To use as an emergency stretcher:
- Lay the tarp flat on the ground
- Move the casualty safely onto the center of the tarp
- Group distribute themselves evenly around the tarp edge
- Roll the edge of the sheet inwards forming a thick roll of fabric
- Use the rolled edges as handles to lift the ‘stretcher’
- If necessary, sticks can be rolled inside the fabric to give extra grip.
Troubleshooting
Getting the hang of tarp camping can be tricky. Here are some common problems and solutions to get you up to speed quickly.
Ridgeline sags when you put the tarp over it
There may be a couple of causes here. One may be the cord you are using. Some cordage has a stretch to it which feels very slight in your hand but over a long distance and with weight on it, the stretch is significant. Perhaps try a few different cord types.
Alternatively, you need to tie your ridgeline higher and tighter. Can you climb into the low fork of a tree to tie the ridgeline? Next use some leverage from the tree trunk when you tension the ridgeline. You need to practice your knots till you can tie them quickly and tie them well, while you keep the ridgeline taut.
The grommets have torn out of the tarp
You now have nothing to tie too, but don’t worry, you don’t have to throw out the tarp. Find a small rock and wrap it in the sheet close to the edge. Now tie your guyline firmly around the fabric, trapping the rock inside for an instant improvised fixing point. If you vary the position of the rock slightly each time, you should be able to use this method many times without damaging the tarp.
The center of the tarp is sagging in ‘Sun Shade’
Tie a line to the center fixing point on your tarp. If you don’t have a center fixing point, improvise with the rock method given above. At the other end of the line attach a fist sized rock (a killick hitch is a good knot to use for this). Throw the fist-sized rock over a high branch then tie the line off to a convenient place. This should pull the center of your tarp up for more headroom.
Go For It
Now you know the basics of tarp camping. From choosing your equipment, to which knots to use, and finally a few basic configurations to get you started.
Don’t forget that it is best to practice these skills in good weather somewhere relatively close to home before you rely on them in tough conditions.
For a guide to the best tarp for camping, see our earlier piece for more insight.
Using a tarp can be a liberating experience, allowing you to get even closer to nature and make the most of your camping trip. Let us know how you get on.
Featured Image Source: https://unsplash.com/photos/0m7B005HrEM