Whether it be for cutting, carving, food preparation, or even survival, a good knife is one of the most versatile and essential pieces of outdoor equipment. Knives come in a variety of shapes and sizes, and can be purchased for as little as a few dollars to even as much as several hundred dollars or more.
No matter the purpose or the price tag, one thing all knives have in common is their need to be regularly and properly sharpened. That’s why knowledge like how to sharpen a knife with a stone is paramount in any situation.
See also: How to Sharpen A Pocket Knife: Lightweight Backpackers’ Edition
You may be asking yourself, “Do I really need to sharpen my own knives? What makes a sharp knife so much better?” Not only is it harder to get the job done with a dull knife, but your personal safety and the safety of those around you is at stake when a dull knife is being used.
In an outdoor setting, this is of course even more critical, as help is not likely to be readily available in case of emergency.
Why a dull blade is more dangerous than a sharp blade:
- It is more prone to failure.
- It is more difficult to use and less precise.
- The user of a dull knife is more likely to apply too much pressure, which could lead to a serious injury in the event that the blade slips from the object being cut and makes contact with a person.
The Whetstone Technique
Still not convinced? Wondering why you would want to do it yourself when you could use an electronic device or pay someone to do it for you? Perhaps you will change your mind when you see how easy it is to master the art form that is knife sharpening using a stone. Below we have outlined the entire process for you step by step.
Follow along, and you too can soon be enjoying the precision, peace of mind, and satisfaction that come from using a properly sharpened blade, not to mention the pride in knowing that you did it yourself! You will also learn a lot more about your knife and blade in the process, which will help make you more skillful in using it.
Things you will need:
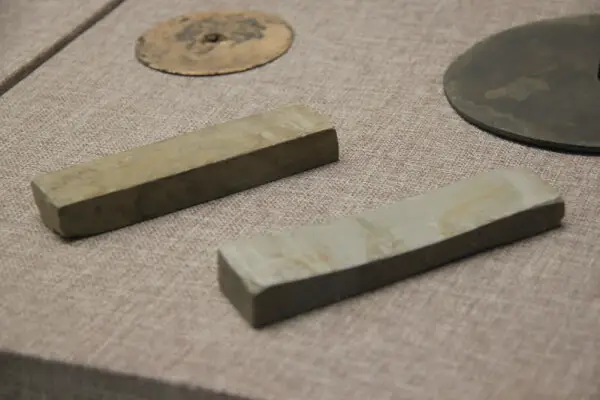
- Whetstone (special stone for knife-sharpening made from granite and other materials such as diamond that are harder than the metal from which the knife is made)
- Honing/ Sharpening Oil, water, or even WD-40 (this will vary depending on the material the stone is made from – generally natural stones require oil and diamond stones require water)
- Clean, soft cloth
- Non-serrated Knife (it is a good idea to practice first on some older, less expensive knives until you feel comfortable with the process)
4 Easy Steps to Sharpening a Knife Using a Whetstone
Step 1: Prepare the Stone
Prepare the whetstone by coating it with a thin film of oil or water. This lubricant will serve to float away steel particles that clog the pores of the stone and reduce its sharpening efficiency.
Step 2: Sharpen side one of the blade
Hold the blade alongside the stone at an angle of approximately 30 degrees. This means that the back of the blade is positioned against the whetstone one-third of the way to standing straight up.
Gently press the blade along the stone as if you were slicing off the outermost layer. Some experts even recommend drawing a line on the blade with a permanent marker, so you can visibly see the layer and be sure that you removed it evenly. The grit of the stone will smooth and sharpen the blade in the same manner that sandpaper is used to smooth rough wood.
As you work, tiny bits of metal will accumulate on the blade. Frequently use the cloth to wipe the blade clean. Cleaning the blade frequently helps achieve a sharp blade by preventing you from grinding the metal particles into the blade. The length of time you will need to spend on this step depends on the condition of the blade. The worst the blade’s edge, the more times it will take to get a sharper edge.
Step 3: Sharpen side two of the blade
Turn the knife over to sharpen the reverse side of the blade. This time, pull it along the whetstone toward you. Pull the blade forward and backward several times until it is similar in appearance to the edge you achieved by sharpening the other side of the blade.
Step 4: Inspect the blade in good lighting
Use the cloth to wipe the blade clean one final time, and inspect the blade by shining a flashlight onto it or by looking at in the sun. If the cutting edge is dull, it will actually reflect the light and appear shiny. On the contrary, if the cutting edge has been properly sharpened, it will be thin enough that it does not reflect any light at all and will actually appear dull.
You can also test the sharpness of your knife with a sheet of paper, as a razor sharp blade will cleanly cut the paper. Once you are satisfied with the sharpness of your blade, store your knife safely until ready for use.
Tips, Tricks, & Warnings
- Use caution when handling a knife for any reason, especially when sharpening the blade. Keep your fingers as clear as possible when sharpening the blade.
- A knife will be easier to sharpen if you dip the cold knife in boiling water for a few seconds first before you begin the process.
- Take care not to apply too much pressure when your rub the knife against the stone. Gentle, consistent pressure is much more effective, and safer, than pressing too hard.
- In case of emergency, where a knife is in need of sharpening but a proper whetstone is not available, this technique could also be used with smooth, flat stones found outdoors – continue reading below for more information about how to sharpen your knife with a stone or rock other than a whetstone.
How to get a sharp knife with a regular stone
Now that you know the basic technique of sharpening a knife with a stone, you can easily apply these same concepts to sharpen a knife outdoors, should you find yourself in a situation where you have remembered to bring your knife, but you have neglected to bring the proper means by which to sharpen it.
Although the basic steps and concept are the same, there are a few important considerations you must keep in mind to avoid injuring yourself or doing permanent damage to the blade of your knife. Even if you never intend to be in that type of situation, it is still worthwhile to be familiar with the steps. It could make all the difference in a survival situation and could even save your life.
Things you will need:
- Suitable stone or stones
- Knife
4 Easy Steps to Use A Stone Found Outdoors
Step 1: Find a suitable rock or stone on which to sharpen your knife
Keep in mind that not just any stone will do for this task. The best type of stone for sharpening a knife is one which is somewhat flat porous in nature and that offers a bit of grit which is necessary for smoothing the blade.
Granite stones, river stones, or something similar make ideal sharpening stones. The size of the stone is also important. You will want to look for one that is easy to hold onto, preferably without sharp points or jagged edges.
If there are a wide variety of stones available, you can achieve even better results by using two stones if you are able to find one that has a rougher grit and one with a grit that is finer. If using two stones, begin with the rougher stone first, and then repeat the same steps with the finer stone.
Step 2: Determine the best and safest way to sharpen your blade without putting yourself at risk of injury
Hold your stone in a way that protects your hands and fingers from getting cut by the blade. As mentioned earlier, safety is even more important in an outdoor setting because you are not likely to have all of the proper first aid equipment to treat an injury, and something that could be easily treated at home could quickly escalate outdoors and turn into a more serious problem.
Extreme caution should always be used when handling your knife, and you should plan and think through the steps before you begin to anticipate how you will complete the task in the safest way possible.
Step 3: Sharpen both sides of the blade
Decide which side of the blade you will sharpen first, and then hold the blade alongside the stone at an angle of approximately 30 degrees, just like you would with a whetstone. Gently press the blade against the stone and rub it evenly forward and backward several times until you have smoothed the edge of the blade consistently.
If you have chosen two stones for this task, begin first with the rougher stone first, and then repeat the process with the finer stone. When you have completed the process with side one, turn the knife over and repeat the sharpening process with the second side.
Step 4: Test and inspect the blade.
Examine the blade using a flashlight or hold it under the sunlight if possible. If the blade appears shiny, it will still be dull and it requires further sharpening. If it looks dull, it will most likely be sharp. Perform a test by cutting a small stick or another item, and repeat the steps as needed until you are satisfied with the sharpness of your blade.
Tips, Tricks, & Warnings
- The best place to find the type of stones needed for sharpening a knife is near a river or other body of water. Stones found near water have been naturally smoothed by nature from the water frequently passing over them.
- You may not always have your pick of the most ideal stones, and therefore you need to be especially cognizant of not damaging your blade beyond repair. If the best stone you can find is more rough or jagged than you would like, remember to work gently and go slowly.
- In case you are unable to locate a stone or rock of any kind, you may also be able to smooth your blade somewhat by following these same steps but using a piece of glass, hard wood, concrete, or another hard object. If this is the case, you must be even more mindful of working gently as to not damage the blade by using a hard or rough material.
Knives are an extremely versatile piece of equipment, and whatever your reason may be for using one outdoors – be it for food preparation, cutting, chopping, carving, or even to protect yourself from the unexpected – you will get the best results and also keep yourself and those around you as safe as possible by using and maintaining a blade that has been properly sharpened.
From the cheapest knife around to even the most expensive, no knife can stay sharp on its own. Check out our tips on how to choose the best backpacking knife to help you with more options.
You could purchase a mechanical or electronic sharpener, or you could pay a professional to sharpen your knives for you, but none of those methods will teach you more about your blade or prepare you for the unexpected more than learning how to do it yourself.
Once you have tried it and produced results, it is easy to see why using a stone is the time-tested method for sharpening both the knife itself, as well as the skills of the knife’s owner.
The Benefits of Using A Sharp Blade
- A properly sharpened blade is safer to use than a dull one, not only for the person using it but for everyone around them.
- A sharp blade will get the job done more quickly and more effectively.
- A sharp blade is more precise, and you may actually be able to accomplish tasks with it that would not be possible if the blade were dull.
The benefits of having the proper skills by which to keep your blade sharp by using a stone:
- Once you know the technique, you need little else to sharpen your knife than a whetstone, (or a stone found in nature) and your knife itself.
- Sharpening your knife yourself teaches your more about that knife, and through the process of sharpening it yourself, you will also sharpen your own knife skills by becoming so intimately familiar with the blade and what it can do.
- The skills to properly sharpen a knife with a whetstone are easily transferable to sharpening a knife in an outdoor setting.
- Knowing how to sharpen your own knife is an important outdoor survival skill.
- Sharpening your own knife is easy, and results in pride and self-satisfaction in a job well done!
Keep in mind: Sharpening a knife with a stone is an art form, and practice makes perfect.
How to Improve Your Technique
Although the process is not a difficult one, it is an extremely specific one, and it may take several attempts before you are comfortable and confident enough in your skills to attempt knife sharpening on your own, especially in an outdoor setting. Hopefully by following these steps, you will soon be enjoying razor sharp knives, as well as the work it takes to get them that way.
As is the case with most new skills, stone-sharpening practice makes perfect, and you should keep the following in mind as you hone your skills:
- Practice on old, worn out knives (such as kitchen knives) so that you don’t end up damaging your favorite or most expensive ones.
- Use a permanent market to color the blade and help you literally see how to smooth off the entire outer layer of the blade.
- Always think the process through ahead of time from start to finish, and try to anticipate any safety risks or hazards.
- Always keep your hands, fingers, and other people or animals out of the path of the blade to avoid injury.
- Resist the temptation to press too hard or work too quickly, and inspect the blade often.
- How often you need to sharpen your knife depends on how frequently you use it, and for what purpose it is being used.
The best way to know if it is time to sharpen your knife it is to inspect and test the blade as often as possible. That being said, check out our review of the top hiking knife for your backpacking needs.
Do you believe that sharpening a knife with a stone produces better results than other methods? We would love to hear about your experience with sharpening knives using whetstones or other types of stones. Have you ever found yourself in a situation where you have had to sharpen a knife and have not had the proper tools available?
Featured Image Source: https://www.flickr.com/photos/101561334@N08/13135853015