We have all been there. Outdoors. Sunny day. You go to reach in your pocket and your hand touches something sticky. When you pull back your hand back you see a glistening smear. Instinctively, you touch the same spot on your pants again.
Guess what? It’s still there. But now you have even more on your skin, pulling at the hairs when you bend your fingers. It’s taking over! Cautiously, you visually inspect your clothing and that’s when you see it. Tree sap. And you have no idea how to get sap out of clothes.
If you are like me, you immediately consider throwing out the affected item. Yes, that would be wasteful. Yes, clothes are expensive. I didn’t say I actually do this. I just strongly consider it. Strongly. Because after all, who wants to go through the hassle of removing such a nefarious substance from fabric? Well, what if I was to tell you it is actually quite easy. It doesn’t require any special chemicals or tools. And it does not take very much time.
I learned this technique when my favorite wool shirt was victimized by a sap covered pine tree. For the first time, I actually cared about the article of clothing which had become unwearable and I wanted solutions. I did some research. I asked around. I tried out some remedies. And, finally, I found a solution.
You Must Know Your Enemy
- Phloem Sap
- Xylem Sap
- Resin
- Pitch
- Amber
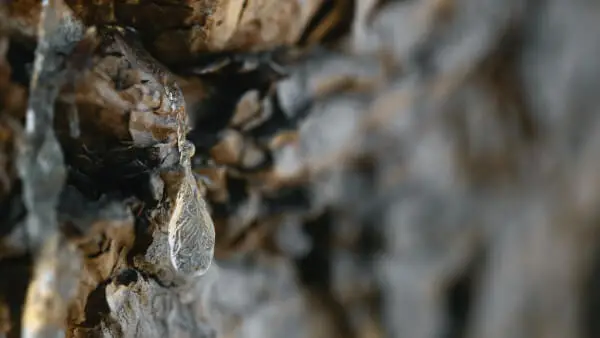
First, I learned a little about the enemy. Sap is a bit more complicated than I previously imagined. There are two types of sap. Phloem sap and xylem sap. Simply put, phloem is the natural pathway in plants that carries nutrients throughout the tree. Xylem carries water. When either of these is damaged, what they carry oozes out and is called sap. Simple, right. It is the sugars in the sap that cause the adhesive properties we abhor on clothing.
There is also another substance produced by trees with similar properties to sap. When a tree is damaged, it bleeds sap and bare wood is exposed to marauding insects and bacteria. To “clot” this wound and protect the new wood until bark can be produced, resin is secreted.
See also: How to Plan a Backpacking Trip: Steps to Ensure the Very Best Outdoor Experience
Some call this substance “pitch” while it remains viscous. Resin eventually dries to a hard finish. When resin is dried for an extremely long time it is called amber. When a mosquito is trapped in this amber and discovered by a geneticist, it is called Jurassic Park.
Standard Operating Procedure for Removing Sap (SAP SOP)
So, you have made it home from a fantastic trip to the woods and you discover sap/resin on your jeans. What to do?
Do not throw the jeans into the washing machine. Laundry detergent will not remove the sap. In fact, it will make your problem worse. Don’t panic. We can handle it. Just follow these easy steps.
Isolate the Offender
Remove the clothing and set aside. Do not toss the jeans in the hamper with the rest of the dirty clothes. The jeans must be isolated or you will spread the sap.
Determine the Extent of Contamination
Sap has a way of traveling through contact, much like a virus. Examine the article of clothing carefully to discover all sap locations present.
Attempt to Remove Hardened Resin
If you came in contact with resin, it is possible that the resin has now dried. Sap may have formed a hard skin, but, like a blister, liquid may be underneath. If completely hard, attempt to gently remove the resin from the clothing material with your fingernail or some flexible plastic, like an old credit card.
Some fabrics, such as denim or canvas, will release hardened resin very easily. Others, such as microfiber and nylon might not. The important part is to remove what you can so that you are left with less to break down and dilute in later steps.
Locate Supplies
You are going to need rubbing alcohol. This is also called isopropyl alcohol. Most likely you have a bottle around somewhere. You will also need two clean cloths, dish detergent, and a water source (Preferably medium to high pressure).
Find a Well-Ventilated Work Area
You will be using a solvent (Rubbing Alcohol) and solvents produce fumes. Take the time to set up a work area outside so that you do not inhale any more fumes than necessary.
Glove Up
Remember how you discovered the problem in the first place? Those unexpectedly sticky fingers? Let’s not have a repeat performance.
If you do not already, keep a stash of nitrile gloves, or latex if you are not allergic, in the garage for projects like this.
Test the Fabric
I know these are just an old pair of jeans, but what if it was an expensive pair of pants with quick dry technology and zip-off pant legs? Besides, who wants an unnecessary stain on their clothing? Not me. Find a spot on your article of clothing that does not show but is dyed the same color as the exterior of the garment.
Maybe around the back of one pant leg or the underside of a seam on the pant cuff. Put a small amount of rubbing alcohol on a clean cloth and dab onto the fabric of your test area. If it does not immediately discolor, rub the area lightly, saturating the fabric and agitating the fibers of the material.
Watch for signs of discoloration or damage to the integrity of the material. Rinse the area with water. Rub a drop of dish detergent into the fabric you tested and rinse again, thoroughly. Allow to dry. Inspect your test area. If no damage occurred, you are ready to proceed.
Apply the Rubbing Alcohol to the Sap
Using a clean cloth, apply rubbing alcohol to one corner. Don’t be shy, saturate that part of the rag. Slowly massage the alcohol into the sap. Keep the area wet by reapplying alcohol to the cloth. Do not apply the rubbing alcohol directly to the jeans. We are looking for control here.
Examine the Area and Re-Apply if Needed
Most sap stains are removed in layers. Stop periodically and take a close look at your progress. Continue to apply rubbing alcohol and remove sap until no sap remains. Do not get lazy and expect the washing machine to finish the job. It won’t happen.
Rinse the Area
With a pressurized water source, I use a garden hose but a wash sink will work, rinse the jeans thoroughly. You need to remove all the alcohol and the broken-down sap.
If you do not, the material could be affected and the sap could reappear throughout the jeans.
Dish Soap
Grab a new clean cloth and apply a small amount of dish soap to one corner. Rub the soap thoroughly into the area you just rinsed. If the soap forms a paste add a small amount of water and rub vigorously, working the soap through the fabric. This will separate any stubborn sap still clinging to the cloth fibers. Rinse thoroughly.
Now for the Washing Machine
If you are sure you have thoroughly rinsed the jeans, go ahead and throw them into the washing machine. If you are worried, put them in by themselves. Of course, if you are worried you should still be at step eleven, rinsing.
Line Dry to Ensure Success
Remove the jeans from the washing machine. You can look at the spot where the sap once lived but it won’t matter. You will not be able to tell if you have succeeded until the jeans are dry. Do not throw the jeans in your dryer.
If any sap remains, the heat from the dryer will make the stain nearly impossible to remove. Line dry your jeans in the open air. I throw them over the roll bar of my jeep in the garage. It works great.
Enjoy your Sap Free Jeans
This is not really a step but I did not want to finish on thirteen. We need all the luck we can get. Once the jeans are dry, inspect the area where the stain once was. If you can still see some sap, repeat the process. If not, throw on your pants and enjoy.
Household Alternatives to Rubbing Alcohol
Some of us might not have rubbing alcohol around the house. No worries. Several other products will work in the same way. Here are a few.
- Nail Polish Remover
- Acetone
- Adhesive Remover
- Citrus Degreaser
- Mechanic’s Soap (The Orange Stuff)
- Adhesive Remover
These alternatives will remove sap but for various reasons are not an optimal choice when compared to rubbing alcohol. Nail polish remover will work because it contains solvents like Acetone, as does adhesive remover. These solvents are very powerful and are considered toxic. Breathing their fumes can be far more hazardous than working with isopropyl alcohol. Also, solvents are far more likely to affect clothing dye.
Citrus degreaser and mechanic’s soap, which normally contains citrus degreaser, utilize weak solvents and citrus terpenes to break down foreign material. Although safer to work with, you might find yourself having to work much harder for the same results. And who wants that?
What About While You Are Out on the Trail?
I get it, you are trying to keep your pack light and lugging around a bottle of rubbing alcohol is not going to work for you. No problem, there is a trail friendly solution and you might already have it on your pack list. I know I do.
The next time you use a bottle of hand sanitizer turn it over and read the back. You might be surprised to find the active ingredient is isopropyl alcohol. Yep. The same stuff I recommended earlier in this post to take sap out of clothing. Why did I not just include hand sanitizer then? Let me explain.
Hand sanitizer contains isopropyl alcohol but in lesser quantities than rubbing alcohol, making it less effective as a solvent. It also contains other ingredients such as perfumes and skin softeners which could actually harm your clothing, depending on the dye and material used. Also, by volume it is significantly more expensive than rubbing alcohol.
But out on the trail, the benefit of carrying something that serves dual purposes is substantial. If you get sap on your hands, use hand sanitizer. It’ll take it right off. On your clothes? I would test an area and then use the sanitizer if no discoloring occurred.
Problematic Fabric
As I mentioned, certain fabrics will pose greater problems than others regardless of the product used. Fleece is tough. Solvents will break down the sap but the texture of the fleece can be altered, leaving a thumbprint type indentation. Waterproof fabrics may be negatively impacted.
The solvent may break down the sap along with the waterproofing used by the manufacturer. I would not recommend using a solvent on delicate fabrics such as silk or rayon. If you happen to have hiking gear made of those fabrics I would recommend a professional dry cleaner.
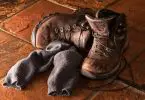
Leather requires an entirely different approach. Peanut butter. Much like the remedy for gum in a child’s hair, peanut butter is reported to remove tree sap from leather products. I tried it on some boots. If your leather is unsealed the oils from the peanut butter may stain the leather, but it does remove the sap.
Avoidance is Key
Self-defense instructors teach the best way to survive a fight is to not fight at all. Basic avoidance. The same is true for sap. Trees produce sap mostly in the spring. Certain types of trees produce a far greater amount of sap than others. Here is a short list of trees to avoid if you hate sap.
- Birch
- Maple
- Elm
- Pine
Don’t park under these trees, pitch your tent under them, or grab the fresh cut end of one of their limbs unless you like sap. Especially during spring.
Don’t avoid the forest altogether, that would be crazy. Just avoid rubbing up against these particular trees when possible.
Final Thoughts on Sap
Sap is part of the experience of being outdoors. Yes, it can be annoying and yes it can be destructive. But it is also vital to the health and development of the great forests. It is a necessary evil. Hopefully this tutorial armed you with some knowledge to address sap if it ever stows away on your clothes and makes cleaning up after your next outdoor excursion easier. Before you leave for your next trip, check out more hiking and camping hacks to make your journey a safe one.
Are you experienced in removing sap from clothing? Do you have any tips, tricks or techniques you can share with us and our readers? If so, please leave them in the comments section. We would love to hear from you.
Featured Image Source: https://unsplash.com/photos/Dpd20chhU1o