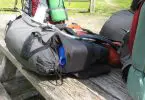
A well-stocked backpacking first aid kit is mandatory when preparing for an outdoor trip. Cuts, bruises, blisters or scratches are all pretty common when hiking, and can become infected unless disinfected and treated properly.
See also: How to Care for A Blister: When Medicine Isn’t Available
You also need to be prepared for other, more serious injuries that might happen: broken limbs, serious hemorrhage, allergic reactions and animal attacks.
The first step, when starting to build your own first aid kit, is to thoroughly assess the risks you are facing during your trip.
For a weekend camping trip in an area not too far away from civilization, you need a pretty simple, basic kit, but when it comes to longer backpacking adventures in the middle of nowhere, it’s essential to cover all your bases and to pack a very well stocked first aid kit.
Why should you build your own kit, instead of buying an already-made one? Well, the first aid kits you find in stores contain the basic supplies you will probably need during your camping trip, but building your own allows you to personalize it for your particular needs (and the needs of your camping trip companions).
Also, it costs less to build your own, and you will have a clearer image of each and every item in your kit.
Apart from bringing a first aid kit with you on every trip, it’s also important to learn the basic first aid techniques: how to stop a hemorrhage, how to immobilize a sprained or broken limb, how to perform the Heimlich maneuver, how to check for a concussion and what to do in such a situation.
Keep reading to find out what your first aid kit should contain and to learn how to offer first aid when needed.
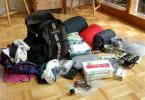
Basic Backpacking First Aid Kit
This basic kit is indispensable when camping, even if it’s only a short weekend trip.
First, you need to find a waterproof bag with multiple compartments (a toiletry bag, for example) that will help you organize your stuff in categories, and will also keep it dry and safe.
- Bandages in several sizes and shapes for small cuts and scratches;
- Sterile dressing pads;
- Gauze roll;
- Closure strips for larger wounds;
- Adhesive tape for holding dressing pads in place;
- Elastic wraps;
- Cotton-tip swabs;
- Disposable gloves;
- Moleskin and molefoam for blisters and irritations;
- Sterile gloves;
- Hand sanitizer;
- Scissors and tweezers;
- Thermometer;
- Iodine;
- Antiseptic wet wipes;
- Hydrogen peroxide;
- Antibiotic ointment;
- Anti-inflammatory ointment;
- Antihistamines (ointment or pills) to deal with insect bites or allergic reactions;
- Anti-inflammatory medication, painkillers: depending on what you usually take, but it’s recommendable to pack some Ibuprofen, Aspirin and Aleve to cover all the basis;
- Anti-diarrhea medication, such as Imodium;
- Burn relief spray;
- Vaseline and baby powder;
- Sunscreen, lip balm;
- A tube of zinc oxide to prevent thigh chafing;
- Any prescription medication you take daily;
Although it might look like a pretty long list, the idea is to pack only as much as you need for each trip. Not a whole bottle of Aspirin, but 10 pills, and so on.
You can either buy the ointments and the antiseptic liquids in small packages or you can buy regular sizes and move some of it in smaller containers. You just need to make sure that you label each substance correctly and you also add the expiration date on each container.
You probably won’t use all the items in your first aid kit during one trip (hopefully), and you can, of course, keep the first aid kit and use it during future camping trips. However, before each trip, check the content of the kit and replace anything that’s expired.
Make sure that the adhesive tape and the bandages are intact and not damaged by humidity or exposure to heat and sunlight.
Enhanced First Aid Kit
If you’re planning a longer camping trip in the wilderness, in areas where emergency services might take a while to respond, your first aid kit needs to be expanded.
So, beside the things listed above, here are the other items you should pack with you:
- An irrigation syringe to disinfect wounds;
- A suction syringe, used for clearing mouth of fluids while performing CPR;
- A CPR mask – it has a valve that protects the user from blood, vomit or saliva;
- Triangular bandage to use for slings or in case of a fracture;
- An anti-hemorrhagic agent, such as Quikcloth, to stop bleeding quickly;
- A snake bite kit;
- Injectable epinephrine, in case of serious allergic reactions;
- Glucose, that you can use for hypoglycemia;
- Rehydration salts;
- Water purifying tablets;
- Broad spectrum antibiotics;
- Emergency thermal blanket;
- Multivitamins and minerals tablets (pretty useful if you spend long periods of time camping, without access to varied or fresh foods);
- Malaria tablets (if you’re traveling in an area where the disease is endemic);
- Altitude sickness pills, if you are camping in high-altitude areas;
First Aid Guide for The Most Common Types of Injuries
Even more important than your first aid kit is to actually know how to react in case of emergency. People trekking in the wilderness have to be able to perform CPR, to know how to control a hemorrhage, how to deal with a concussion or a fracture.
Check with local health providers in your area: many hospitals and clinics organize first aid courses or can recommend you to another organization that provides such a service. It’s a very good idea to take such a course if you are planning a backpacking adventure in the wilderness.
Also, there are pamphlets explaining how to act in case of health emergencies: pack one in your first aid kit. Here is some basic first aid information you should master before embarking for an adventure in the wilderness:
First aid for bleeding
The loss of blood can be life threatening in just minutes, and you need to know how to react if you or a camping companion suffers a wound that involves lots of bleeding.
- The first step is to check the person’s pulse and breathing then contact emergency services to ask for help if at all possible.
- The next step is checking the area. Cut the clothing for easier access and put on a pair of gloves. The most important thing is to stop the bleeding, so, for now, don’t waste time trying to clean or disinfect the wound. Just make sure that your hands are clean, that you are using gloves and apply pressure on the wound using a clean dressing pad from your first aid kit. Get the victim to lie down and elevate the wounded area above the heart, if it’s possible. Elevation slows the blood flow and helps blood clotting.
- If it’s a serious injury, where an internal organ or organs are visible, do not apply pressure. Cover the area with clean dressing pads and wait for emergency services.
- If there is an object deeply embedded, penetrating the body of the victim, do not try to remove it and do not apply pressure on the object. At times, these objects might be blocking damaged blood vessels, thus reducing the flow, and trying to remove them would result in fatal blood loss. Cover the wound as much as possible and wait for emergency services.
- Apply pressure on the wound for at least 20 minutes before checking the wound. It takes a while before the blood starts clotting, and if you remove the dressing pads and expose the wound, you might dislodge the blood clot. If the blood gets through the padding, do not remove the pad. Add a second one on top of it and keep applying pressure.
- You can bind the wound with a bandage, elastic wrap or adhesive tape, trying to create as much pressure on the wounded area as possible. Once the bleeding starts slowing down, secure the padding firmly in place and immobilize the injured part of the body.
- Cover the victim with a blanket, as blood loss often leads to hypothermia. Stay with the injured person until medical help arrives, checking their pulse and breathing, and the wound. Do not offer food or drinks to the injured person unless you were given permission by the emergency services team.
What to do when the bleeding doesn’t stop:
If the bleeding doesn’t stop after applying pressure, you might need to use a more extreme method – a constrictive bandage, also known as a tourniquet.
The tourniquet stops the blood flow to the area completely, but it also has some risks, because shutting down blood circulation in an area damages the tissue and might result in the loss of a limb.
Thus, it’s important to monitor for how long the tourniquet stays on and to restore blood circulation every thirty minutes.
- Wrap a folded, triangular bandage, a piece of cloth or a belt tightly around the injured limb, between the wound and the heart of the person. Make a knot and, to tighten the knot, put a stick or a pen on top of the first knot, make a second one and start squeezing the stick or the pen. Your goal is to stop the pulse below the tourniquet.
- Write down the time when you applied the constrictive bandage. It’s a good idea to write the time directly on the skin of the victim – this way, you don’t risk losing a piece of paper, and the medical help will also be able to see the time.
- After thirty minutes, release the tourniquet. If the bleeding stopped, apply clean dressing pads on the wound and secure them with adhesive tape. If there is still serious bleeding, close the tourniquet again, and write down the new time.
For guidelines on how to determine if a cut is infected, read our article on this topic.
How to perform CPR (cardiopulmonary resuscitation)
CPR is designed to manually restart circulation and breathing in a person through breathing into the victim’s airways and through chest compressions.
Before starting CPR, you should also call emergency services.
- The first step is to check if the airway is blocked and to remove any visible obstruction. Then, check for breathing again and if it didn’t start give two initial breaths, with your mouth directly on top of the victim’s mouth, while keeping his or her nostrils closed with one hand. Watch the chest to see if it rises.
- If there is not yet sign of life, proceed with 30 chest compression, with your hands pressing directly on top of the victim’s heart. After the compressions, give two more breaths and check the chest again. Continue with the same cycle, until the victim starts breathing or the medical help arrives.
Watch the following video to learn more about CPR:
First aid for fractures
In case of fractures, the best course is to stop the person from moving, immobilize the limb and wait for emergency services to arrive.
- The person that sustained the injury should avoid moving the injured limb: sometimes, people try to assess the nature of the injury by moving the injured part, but this could cause further damage;
- If there is bleeding, contain it by applying dressing pads and pressure on the wound.
- Gently touch the length of the bone, checking for irregularities, bumps or swollen areas.
- Use a splint to immobilize the injured part and the joints below and above that area. Any long, straight, firm object can make a splint, if you don’t have one in your first aid kit. Immobilization prevents the broken bone from moving and cutting though tissue, blood vessels and nerves, and it also helps managing the pain. Do not try to reposition or straighten the broken limb – try to keep it as steady as possible.
- Put some padding between the injured limb and the splint (dressing pads or, if you don’t have any, a piece of clean clothing). Wrap the splint and the injured limb tightly, using elastic wraps and adhesive tape. If you don’t have the proper supplies in your first aid kit, tear a piece of clothing into strips and secure the splint.
- For broken arms, a sling around the neck is better than immobilizing the arm with a splint. Use a triangular bandage or another piece of cloth (a scarf, for example) to suspend the person’s arm from their neck. Make sure the hand is higher than the elbow.
- Check for pulse above and below the fracture. A limb without pulse requires immediate medical attention and surgery and you must inform emergency services about the situation.
First aid for burns
Burns can vary a lot in gravity, from first degree burns where only the outer layer of the skin is affected to second degree ones (the outer and the underlying skin is damaged) to third and four degree burns, where the tissue and sometimes even the bone is affected. See our piece on more hiking safety tips for more information.
What to do in case of minor burns (first and second degree burns):
- The first priority is to stop the burning process by applying cool water over the area.
- Use burn relief spray or aloe Vera gel from your first aid kit.
- Cover the area with dry, non-stick, sterile dressing.
- Take some pain medication (Ibuprofen, for example, as it also helps with inflammation).
- Change the dressing every few hours, and keep the area dry.
- Use antibiotic ointment if signs of infection appear
What to do in case on major burns:
- If a person is on fire, help extinguish the fire by wrapping the person in a blanket or other thick material. You can also use water.
- Call emergency services immediately.
- Keep the victim as comfortable as possible by placing cool, moist (and sterile, if possible) dressings over the burn area.
- Elevate the burn area above the heart, if it’s possible, and get the person to lay down with the legs elevated to prevent shock.
- Cover the person with a jacket or blanket.
- Do not try to remove clothing or jewelry that is stuck to the wound, because you will only cause further damage. Don’t apply ointments or sprays on major burns, because it doesn’t help and the doctors will have to remove it to assess the wounds.
- Do not cough or breath on the burn area, keep dirt or other particles from getting into the wounds.
- Don’t position the head of the victim in a way that could obstruct the airway. Victims of major burns often have burns on the airway as well and it’s important to keep them as open as possible.
For more tips on how to put together the best camping first aid kit, check out our article.
Featured Image Source: “backpacking first aid kit” by Deacon Kevin is licensed under CC BY-NC 2.0